Thursday, February 28, 2019

How to Import Photos from iPhone to Mac


How to Import Photos from iPhone to Mac Using the USB Connection

To import photos from iPhone to Mac using a USB connection, follow the steps given below:


Connect your iPhone to your Mac using the USB cable.


If the photos app doesn’t get launched automatically, open it.


Select the photos you want to import and click on “Import Selected” or click on “Import New” if you want to import all pictures.


Method 3: How to Import Photos from iPhone to Mac Using My Photo Stream

Photos from your iPhone automatically appear in the Photos app via My Photo Stream feature if you enable the option in your iPhone’s settings. Follow the easy steps given below:


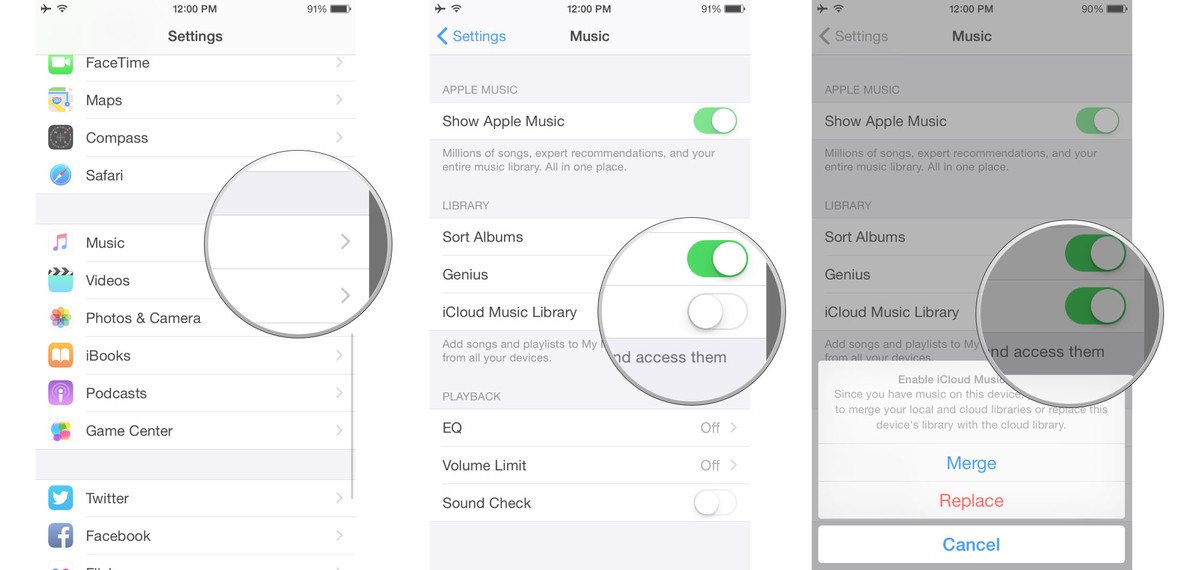
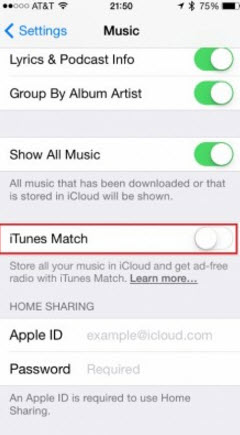
Open the Settings of your iPhone and navigate to the Photos tab.


Switch on My Photo Stream.


On your Mac, open the Photos app and navigate to Photos>Preferences>iCloud> and select My Photo Stream.


To view your photos, choose My Photo Stream from the sidebar to see your imported pictures on your Mac.
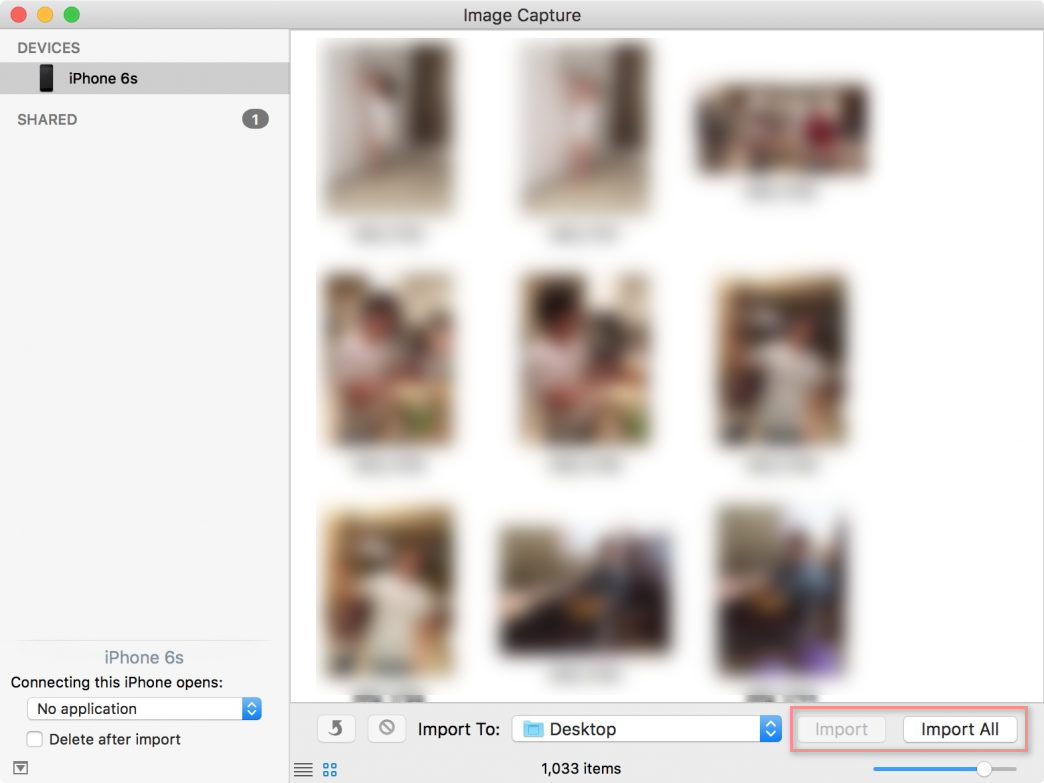
Method 4: How to Import Photos from iPhone to Mac Using Image Capture

If you want an easier option, you can switch to Image Capture to import photos from iPhone to Mac. Using this method, you can choose where you want to save your imported photos on your Mac. Remember – Image Capture is a free of cost app which is preloaded on all MacBook. Follow the below steps using Image Capture:


Connect your iPhone to your Mac the USB cable and launch Image Capture.


Select your iPhone device from the list of connected devices.


Open the drop-down menu beside “Import To” and choose the folder you want to import your photos into.


Select the photos you wish to import and click on “Import” or “Import All” if you want to transfer all the pictures in one go.


Method 5: How to Import Photos from iPhone to Mac using Email or iMessage

If you are not comfortable using any of the methods mentioned above, here’s the common method to import photos from iPhone to Mac. You can share several photos with your friends and family in one go using Email or iMessage. This is how you can do it:Sponsor ads:A List of Top 10 Axxo Movies Proxy and Mirror Sites 2019
Sponsor ads:8 Best Offline Music Apps for iPhone to Enjoy Music Everywhere
Sponsor ads:How to Permanently Delete Photos and Videos from Samsung Mobile Phone
Sponsor ads:Top 15 Best Sites Like FMovies for You to Download Movies and TV Shows 2019


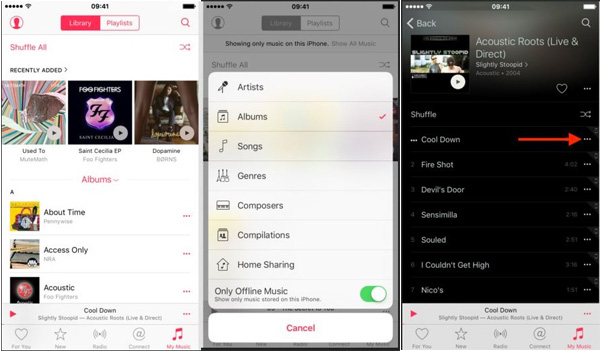
Launch the Photos app on your iPhone.


Click on Albums to open the Albums gallery.


Pick your target album.


Click on the Edit button.


Pick the photos you want to transfer.


Click on the Share button and select Email or iMessage.


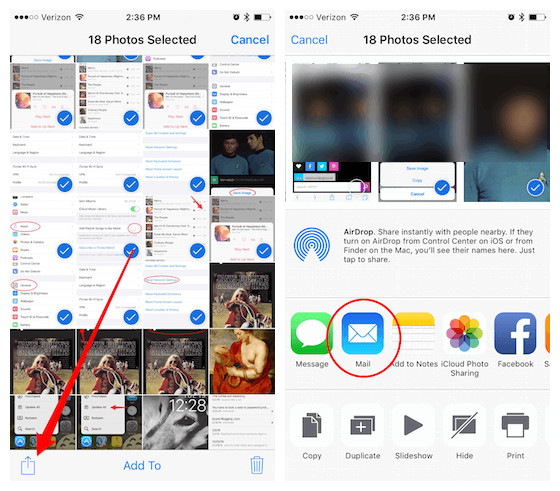
Using your Email address, send all the photos to yourself.


Open your Email ID on your Mac and download the photos.

Sponsor ads:

Gihosoft Free iPhone Data Recovery:https://www.gihosoft.com/iphone-data-recovery-free.html

Gihosoft iPhone Data Recovery Free

Free iPhone Data Recovery Software for Windows/Mac

Recover up to 12+ types of files, including contacts, SMS, photos, WhatsApp, Viber, notes, etc.

Restore lost data from iOS devices directly or from iTunes and iCloud backup

Recover iPhone data lost due to iOS upgrade/jailbreak, accidental deletion, device lost or broken

Support all the latest iPhone, iPad and iPod Touch

Both Free and Pro version.

If you lost data after you updated to a new iPhone, you can always use Gihosoft iPhone Data Recovery to get the data back from the old iPhone or backup.You may also like: iphonerecovery.com

If you use android phones, please choose Gihosoft Android Data Recovery.

With Gihosoft Android Data Recovery, no longer afraid of data loss!

Must read:Youtube video downloader for pc

Gihosoft RePicvid Free Photo Recovery Software provides a free photo recovery software for windows to help users recover the deleted or lost photo for free.

Jihosoft Android Data Recovery: the best Android Data Recovery software for Windows and Mac to recover deleted contacts, messages, photos, videos, WhatsApp and etc from Android devices.Tips:How to transfer messages from iPhone to iPhone

jihosoft Free iPhone Data Recovery

A Pair of Unannounced iPad Models Receive Certification in India


It certainly seems like we are closer to Apple announcing new iPad models, as the company continues to earn regulatory approval across the globe.

This time, Apple has earned certification for a pair of new iPad models from the Bureau of Indian Standards (BIS) in India. The two model numbers approved by the regulatory body are A2124 and A2133. For those who keep track of this sort of thing, these are the same model numbers that were approved earlier this year by the Eurasian Economic Commission (ECC). At that time, though, Apple included a handful of additional iPad models as well.

Sponsor ads:Set a Voice Recording as a Ringtone on iPhone Xs/X/8/7/6s

Sponsor ads:Fix: Windows 10 Go Back to An Earlier Build Missing after 10 Days

Sponsor ads:How to Fix Windows was Unable to Format SD Card/USB Drive

As far as the rumor mill is concerned, Apple is going to unveil a brand new iPad mini 5and a new entry-level iPad as well. Both models will see upgrades to the specifications. However, based on rumors, it sounds like Apple will retain the overall design of the iPad mini, with its bigger bezels, in this new model. Meanwhile, the entry-level iPad may see its screen real estate maximized a bit with smaller bezels.


Both of these new models are expected to be unveiled soon, with a launch rumored for the first half of 2019. However, while it is widely expected that the company will host an event on March 25, that will be primarily focused on subscription services. Apple is rumored to unveil its Apple News subscription model, as well a first-look at its TV streaming service. It is not expected to announce new iPad models at this event.

Still, with approval for new models cropping up on a semi-routine basis, it does appear that we are inching closer to an official announcement sooner rather than later. Apple may have decided that the new iPad models don’t necessarily require a major event, and, that might make sense.

Are you looking forward to new iPad models?

[via MySmartPrice]Sponsor ads:

Gihosoft Free iPhone Data Recovery:https://www.gihosoft.com/iphone-data-recovery-free.html

Gihosoft iPhone Data Recovery Free

Free iPhone Data Recovery Software for Windows/Mac

Recover up to 12+ types of files, including contacts, SMS, photos, WhatsApp, Viber, notes, etc.

Restore lost data from iOS devices directly or from iTunes and iCloud backup

Recover iPhone data lost due to iOS upgrade/jailbreak, accidental deletion, device lost or broken

Support all the latest iPhone, iPad and iPod Touch

Both Free and Pro version.

If you lost data after you updated to a new iPhone, you can always use Gihosoft iPhone Data Recovery to get the data back from the old iPhone or backup.You may also like: iphonerecovery.com

If you use android phones, please choose Gihosoft Android Data Recovery.

With Gihosoft Android Data Recovery, no longer afraid of data loss!

Must read:Youtube video downloader for pc

Gihosoft RePicvid Free Photo Recovery Software provides a free photo recovery software for windows to help users recover the deleted or lost photo for free.

Jihosoft Android Data Recovery: the best Android Data Recovery software for Windows and Mac to recover deleted contacts, messages, photos, videos, WhatsApp and etc from Android devices.Tips:How to transfer messages from iPhone to iPhone

jihosoft Free iPhone Data Recovery

Tuesday, February 26, 2019

How to Downgrade iOS 12 to iOS 11.4/11 Without Computer 2019

How to Downgrade iOS 12 to iOS 11.4/11 Without Computer 2019

The latest version of Apple’s Operating System – iOS 12 and iOS 12.1 were released recently, and they come with a lot of new features such as group notifications, new digital health feature amongst other features that make this new operating system version impressive. However, while it is worth it to install this version of the iOS, it comes with quite some bugs and flaws such as being unable to connect to the App Store or personal hotspot not turning on. For these reasons, some iOS users who have upgraded may want to remove the updated software from their device.

Fortunately, Apple allows you to downgrade from the new iOS version to an older version. In this post, we will be discussing a step by step guide and especially how you can do the downgrade from iOS 12/12.1 to iOS 11 without computer.


Part 1. What You Need to know before iOS 12 or iOS 12.1 Downgrade


Part 2. Can You Downgrade iOS 12.1.1/12.1 Without Computer


Part 3. How to Downgrade from iOS 12 to iOS 11.4/11 Using iTunes


Part 4. Downgrade iOS 12 to 11.4/11 Without iTunes
Part 1. What You Need to know before iOS 12 or iOS 12.1 Downgrade


You should ensure that all the data on your iPhone or iPad is backed up because a downgrade from iOS 22 to iOS 11 will erase the data on your device. This will help you get back the lost data in case the downgrade is not successful.


Ensure that you have a backup in iTunes before you installed the new iOS 12. This back up should also be compatible with iOS 11 before you downgrade because iOS 12 backups are not compatible with iOS 11.


If the backup you have is for only iOS 12 or iOS 12.1, then for you to restore from the iOS 12/12.1 backup, you may have to update to iOS 12/12.1 before you can downgrade to iOS 11. However, do not worry because there are professional data recovery tools that can help you recover lost files after you have finished downgrading.


Typically, Apple stops signing previous iOS versions after releasing iOS 12 or 12.1, and this means you may not have a lot of time to downgrade from iOS 12/12.1 to iOS 11.
Part 2. Can You Downgrade iOS 12.1.1/12.1 Without Computer

If you are thinking about downgrading your iOS version from iOS 12 to iOS 11 without using a computer, we have to let you know that it is not possible. Whether it is iTunes or another software that you use, you will have to carry out the process of downgrading your iOS on a computer. If anybody tells you they can help you downgrade to an older iOS version, they are not being honest with you. Do not leave your device with them because your data may not be safe with them.
Part 3. How to Downgrade from iOS 12 to iOS 11.4/11 Using iTunes
Step 1: Disable “Find My iPhone.”

Typically, every restore operation on iOS devices involves disabling “Find My iPhone” although you can do this after wiping all the data on the device since you will get a prompt to do that. It only makes more sense to disable the feature first to avoid problems later.

You can disable “Find My iPhone” by opening the settings app and tap “iCloud.” Once it opens, scroll down to disable “Find My Phone.” You will have to enter your Apple ID password to disable the feature.


Step 2. Download the IPSW File for Your iPhone

Search the internet for the iOS 11.4.1 IPSW file for your iPhone model. We have put together direct links for various iPhone models that you can download. These links are directly from Apple’s servers so keep your mind at rest that your phone is secure. Note that the files are large so be ready to wait for a while. If you download the files on a MacBook, you will find the files in your “Download” folder.


iPhone X


iPhone 8


iPhone 8 Plus


iPhone 7


iPhone 7 Plus


iPhone 6S


iPhone 6S Plus


iPhone 6


iPhone 6 Plus


iPhone SE


iPhone 5S


12.9-inch iPad Pro (2nd generation)


12.9-inch iPad Pro (1st generation)


10.5-inch iPad Pro


9.7-inch iPad Pro


9.7-inch iPad (6th generation)


9.7-inch iPad (5th generation)


iPad Air 2


iPad Air


iPad mini 4


iPad mini 3


iPad mini 2


iPod touch (6th generation)
Step 3. Downgrade with iTunes

After you have downloaded the right IPSW file for your iPhone model, connect your iPhone to your computer. Remember that we have established the impossibility of downgrading without a computer. After connecting your phone to your computer, your computer should launch iTunes automatically. If it does not, unlock the phone, allow the phone to trust the computer. If iTunes prompt you to install an update for you to connect the device with the latest iOS version, install the update.

After the phone has successfully connected to iTunes, the phone icon should be right next to the media dropdown. Click on the icon and navigate to “Summary.” Then click 'Restore Backup' and install the firmware package that you downloaded just now. After the restore procee, your iPhone will be back to iOS 11 or older versions.


Part 4. Downgrade iOS 12 to 11.4/11 Without iTunes

If you find it difficult to downgrade from iOS 12 to iOS 11.4, an effective tool that you can use is iMyFone Fixppo. The tool is simple to use, reliable and has a track history of 100% success. With iMyFone Fixppo iOS System Recovery, you will be able to fix all iOS issues the occurred on iPhone, iPad, iPod touch, and it also allow you to downgrade iOS version to older versions. Even better, the tool ensures that you do not lose your phone data when you use it. Check the steps below to downgrade from iOS 12 to iOS 11 or older iOS version with ease.

Sponsor ads:

Gihosoft Free iPhone Data Recovery:https://www.gihosoft.com/iphone-data-recovery-free.html

Gihosoft iPhone Data Recovery Free

Free iPhone Data Recovery Software for Windows/Mac

Recover up to 12+ types of files, including contacts, SMS, photos, WhatsApp, Viber, notes, etc.

Restore lost data from iOS devices directly or from iTunes and iCloud backup

Recover iPhone data lost due to iOS upgrade/jailbreak, accidental deletion, device lost or broken

Support all the latest iPhone, iPad and iPod Touch

Both Free and Pro version.

If you lost data after you updated to a new iPhone, you can always use Gihosoft iPhone Data Recovery to get the data back from the old iPhone or backup.You may also like: iphonerecovery.com

If you use android phones, please choose Gihosoft Android Data Recovery.

With Gihosoft Android Data Recovery, no longer afraid of data loss!

Must read:Youtube video downloader for pc

Gihosoft RePicvid Free Photo Recovery Software provides a free photo recovery software for windows to help users recover the deleted or lost photo for free.

Jihosoft Android Data Recovery: the best Android Data Recovery software for Windows and Mac to recover deleted contacts, messages, photos, videos, WhatsApp and etc from Android devices.Tips:How to transfer messages from iPhone to iPhone


jihosoft Free iPhone Data Recovery

Monday, February 25, 2019

Fix “iTunes Add to Device Not Working”


1 Check on the Available Space on Your Device

Sometimes iTunes add to device not working may be due to the lack of enough space. When transferring music and HD videos the files might take up more space and ones full then you will not be able to add music to your device. To check your phones space available space open Settings > General > iPhone Storage. If storage is the problem, then clean up some of the files you do not need any more to create space for new songs.
2 Update iTunes Software

iTunes add music to device not working may be due to minor software problems. The iTunes version in use may be causing all the issues, and an update may fix the problem. To update iTunes for your windows PC open iTunes and go to iTunes and tap Help > Check for Updates. For Mac open iTunes > Check for Updates. If updating iTunes does not fix the problem, uninstall iTunes completely and do a clean install.


3 Check the Location of the Songs You Want to Add to Your iDevice

iTunes add music to device not working may also result from iTunes not locating the specific files you want to add because maybe you had moved or deleted them earlier. It rarely indicates the missing files until you select them. To fix this problem double check whether the files you want to your device is in the same location as when it was added to the library.
4 Uncheck iCloud Music Library to Fix “iTunes Add to Device Not Working”

At times when the iCloud music library is turned on it might corrupt your iTunes library. Also, when it is on it blocks one from manually syncing music or other files from iTunes to your phone which is the main reason why adding music to your iPhone may not be working. To turn it off, go to Settings on iPhone > Music > uncheck iCloud Music Library.


5 Restart Both Your iDevice and ComputerAlso Read:Create Boomerang from Existing Videos on Android/iPhone 2019
Also Read:Rotate Video on Facebook 2019

If your iTunes still can not add to music, turn off both your iPhone and Mac/PC and then relaunch iTunes and repeat the process of adding files to your device again.


6 Disable iTunes match to Fix “iTunes Add to Device Not Working”

Just like when iCloud music library is on iTunes match also prevents adding music manually to your iDevice. Go to Settings > Music in your iPhone, and disable the iTunes match option.


7 Using iTunes Alternative to Solve Add music to iDevice not Working Also Read:Delete the Downloaded iOS Update on iPhone/iPad (iOS 12)
Sponsor ads:Fix Audio Issues on Windows 10 with 5 Methods that Work in 2019

Sunday, February 24, 2019

How to Transfer Data from One iPhone to Another 2019


How to Transfer Data from One iPhone to Another 2019
Do you have a new iPhone and want to transfer your data from your old one? Do you want to share your files with a friend? Do you simply have two iPhones and you want to send data from one to the other?

There can be many reasons why you would want to transfer data from one iPhone to another. How do you do it efficiently, though? Should you use iTunes, or is there a better way? Let's explore this below:


What You Should Know before Transferring iPhone to iPhone


How to Transfer from iPhone to iPhone Using iCloud


How to Transfer Data From iPhone to iPhone Using iTunes


Transfer iPhone to iPhone Using iMyFone iTransor
What You Should Know before Transferring iPhone to iPhone

The two most obvious methods for transferring data from one iPhone to another are using iCloud or iTunes. For both of these methods, the steps are similar. First, you back up one of the phones, and then you simply restore that backup to the second iPhone. This is fairly easy, but there are also certain restrictions that come with these official methods (which we'll discuss more below).

For now, though, let's take a closer look at how to transfer data from iPhone to iPhone using iCloud or iTunes:
How to Transfer from iPhone to iPhone Using iCloud

Transferring files from one iPhone to another iPhone using iCloud is fairly straightforward. Here is how you do it:

(1) First, sign out of all of your accounts and unpair any devices from your first phone (the one you're transferring the data from), such as your Apple Watch.

(2) Make sure that the first iPhone is also connected to a strong WiFi network.

(3) On your phone, go to Settings > [The Name on Your Account> iCloud > iCloud Backup. Turn iCloud Backup on at this time by tapping the slider.

(4) Your phone will now attempt to back itself up to iCloud. Wait the first iPhone to finish the backup.

(5) Turn on the second iPhone. Assuming, it's new, it should have an introductory Hello screen.

(6) Just press the Home button and follow the on-screen instructions until you are asked to join a WiFi network. Join your network, and then continue following the instructions.

(7) When you are at the Apps & Data screen, notice where it says Restore From iCloud Backup. Tap that, then hit Next.

(8) You will be asked to sign in. Do so with your Apple ID and password.

(9) From the list, choose which backup you want to transfer data from it (probably the latest one).

(10) Now wait until the backup is restored. After this is done, you can continue your setup normally by following the instructions on the screen.


In addition, if you are connected to WiFi, then your phone should sync with iCloud and automatically download all of the media that you own.
How to Transfer Data From iPhone to iPhone Using iTunes

Another way to transfer data between iPhones is by simply using iTunes. This is probably one of the most popular methods, even though it's not the best one. Here is how you do it:

(1) Connect the first iPhone to your computer and launch iTunes.

(2) Go to the Help menu and check for updates. If there is one, then install it first.

(3) Click on your device icon.

(4) Click Back Up Now on the summary page for your device.

(5) Wait until it is done backing up. You can check to make sure it backed up correctly by going to iTunes Preferences > Devices. There will be a list of devices as well as when they were backed up. Look for yours.

(6) Next, turn on the second iPhone until you get to the Hello screen. Press the Home button and follow the directions until you get to the Apps & Data screen.

(7) Tap Restore iTunes From Backup and then tap Next.

(8) Plug the iPhone into your computer.

(9) Open up iTunes, then click on your device icon.

(10) In the summary page, click Restore Backup…

(11) Pick a backup to restore from, then wait for the backup to restore. After that is done, you can proceed with the setup process on the second iPhone.


As you can see, just like the iCloud method, this basically consists of backing up one device and then restoring the backup on the other.
Transfer iPhone to iPhone Using iMyFone iTransor

Sponsor ads:

Gihosoft Free iPhone Data Recovery:https://www.gihosoft.com/iphone-data-recovery-free.html

Gihosoft iPhone Data Recovery Free

Free iPhone Data Recovery Software for Windows/Mac

Recover up to 12+ types of files, including contacts, SMS, photos, WhatsApp, Viber, notes, etc.

Restore lost data from iOS devices directly or from iTunes and iCloud backup

Recover iPhone data lost due to iOS upgrade/jailbreak, accidental deletion, device lost or broken

Support all the latest iPhone, iPad and iPod Touch

Both Free and Pro version.

If you lost data after you updated to a new iPhone, you can always use Gihosoft iPhone Data Recovery to get the data back from the old iPhone or backup.You may also like: iphonerecovery.com

If you use android phones, please choose Gihosoft Android Data Recovery.

With Gihosoft Android Data Recovery, no longer afraid of data loss!

Must read:Youtube video downloader for pc

Gihosoft RePicvid Free Photo Recovery Software provides a free photo recovery software for windows to help users recover the deleted or lost photo for free.

Jihosoft Android Data Recovery: the best Android Data Recovery software for Windows and Mac to recover deleted contacts, messages, photos, videos, WhatsApp and etc from Android devices.Tips:How to transfer messages from iPhone to iPhone


jihosoft Free iPhone Data Recovery

How To Prevent and Fix Boot Loop Issue On Unc0ver iOS 12 – iOS 12.1.2 Jailbreak


The @pwn20wnd team got around to releasing the first public beta of Unc0ver 3.0.0 with iOS 12 – iOS 12.1.2 jailbreak support yesterday. While the process to jailbreak an iPhone or iPad running iOS 12 – iOS 12.1.2 using Unc0ver is relatively straightforward, many people are ending up with soft bricked iPhones. Or their device ends up going into a boot loop. If you are in the same boat, check out some of our fixes to help solve this issue.

Even if you have not jailbroken your device yet, I will strongly recommend you to ensure that you pay attention to all the warnings and steps below so that your iPhone does not end up in a boot loop.
Prevent iPhone From Boot Looping When Using Unc0ver Jailbreak
Delete OTA File

I cannot stress this enough. If you have not already, make sure to delete any iOS 12 OTA file on your iPhone or iPad before trying to jailbreak it using unc0ver. Not doing so will lead to your iPhone or iPad entering into a boot loop.

You can check whether any OTA file is downloaded on your iPhone or not by going to Settings -> General -> Storage and then looking for the “OTA Update” file. If you come across one, delete it. Proceed to restart your iOS device and then use unc0ver to jailbreak it.
Use Unc0ver b31 or Lower

Do not use the latest b32 release of Unc0ver to jailbreak your iPhone or iPad. That’s because it has some bugs which will end up putting your device in a boot loop. Instead, it is recommended you use the b31 or a lower release as many people managed to successfully jailbreak their iPhone using it right at the first try without any issues.
Turn Off Reload System Daemons

If your iPhone boot loops whenever you try to install new tweaks from Cydia or during the jailbreaking process, you should turn off the Reload System Daemons option. This will solve the boot looping issue. However, if you end up using unc0ver b32 — which has been pulled — or a newer release of the tool, you should turn this option back on after jailbreaking your iPhone.
Cydia Keeps Crashing

If Cydia keeps crashing on your iPhone after a successful jailbreak, you should reboot your iPhone, put it into Airplane mode and open the Unc0ver app. From there, disable the Reload System Daemons option from under Settings. Try opening Cydia again. If that does not work, use the Unc0ver app to jailbreak your iPhone again. Once your iPhone reboots, Cydia should start working properly.
Fix iPhone Boot Loop Issue While Using Unc0ver Jailbreak

If your iPhone or iPad has already entered into a boot loop state while using Unc0ver, your only option is to restore the device. Just to make sure that your iPhone is in a boot loop state and not in a respring loop, try the following steps.

Step 1: Hold the Volume Up button and then press and hold the Volume Down button.

Step 2: Finally, with the two buttons pressed, you need to press the Side/Wake/Power button. Keep them pressed for a few seconds until your iPhone reboots and you see the Apple logo. If the above steps do not work the first time around, keep trying.

If this does not help, your only option now is to restore your iPhone by putting it into DFU mode. However, this will lead to your iPhone being ‘downgraded’ to iOS 12.1.1 b3 as Apple has stopped signing other versions of the OS.

Step 1: Put your iPhone into DFU mode.

➤ Boot iPhone 8, iPhone X Into DFU Mode

For iPhone 7 and iPhone 7 Plus, you can boot it into DFU mode by pressing and holding the Side button. As soon as you see the Apple logo, press and hold the Volume down button. Keep the buttons pressed for 10 seconds after which you need to let go of the power button. Leave the Volume button as well after 5 seconds.

If you end up with an Apple logo or an iTunes logo on the screen, it means that your iPhone is not in DFU mode. Under DFU mode, your iPhone will simply show a black screen. Repeat the steps again in such a case.

Step 2: From DFU mode, you need to try and boot your iPhone into recovery mode. This can take a few tries but keep trying. This will involve connecting the device to a computer and then holding the Side and Volume Down button. Keep them pressed when the Apple logo comes on screen. Only let go of the buttons when you see the “Connect to iTunes” logo on the screen.


Step 3: Open iTunes on your PC. After this, connect your iPhone to it. Your device should get detected by iTunes. If not, unplug and replug. If it does not work, start over.

Step 4: Hold Shift — or Option key if you are using a Mac — and select the Update option. From the window that opens, select the iOS 12.1.1 beta 3 IPSW file.

This will proceed to restore your iPhone to iOS 12.1.1 beta 3. You can then once again try using Unc0ver to jailbreak your iPhone.

Sponsor ads:

Gihosoft Free iPhone Data Recovery:https://www.gihosoft.com/iphone-data-recovery-free.html

Gihosoft iPhone Data Recovery Free

Free iPhone Data Recovery Software for Windows/Mac

Recover up to 12+ types of files, including contacts, SMS, photos, WhatsApp, Viber, notes, etc.

Restore lost data from iOS devices directly or from iTunes and iCloud backup

Recover iPhone data lost due to iOS upgrade/jailbreak, accidental deletion, device lost or broken

Support all the latest iPhone, iPad and iPod Touch

Both Free and Pro version.

If you lost data after you updated to a new iPhone, you can always use Gihosoft iPhone Data Recovery to get the data back from the old iPhone or backup.You may also like: iphonerecovery.com

If you use android phones, please choose Gihosoft Android Data Recovery.

With Gihosoft Android Data Recovery, no longer afraid of data loss!

Must read:Youtube video downloader for pc

Gihosoft RePicvid Free Photo Recovery Software provides a free photo recovery software for windows to help users recover the deleted or lost photo for free.

Jihosoft Android Data Recovery: the best Android Data Recovery software for Windows and Mac to recover deleted contacts, messages, photos, videos, WhatsApp and etc from Android devices.Tips:How to transfer messages from iPhone to iPhone


jihosoft Free iPhone Data Recovery

Friday, February 22, 2019

Magic Cleaner for WhatsApp: A Review and Alternatives 2019

Magic Cleaner for WhatsApp: A Review and Alternatives 2019

Have you ever heard about Magic Cleaner for WhatsApp? Are you curious about how it can do for you? Do you want to know where to download it? You can find the ansers below.
What’s Magic Cleaner for WhatsApp?

Have you ever noticed that WhatsApp likes to hang onto every picture that anyone ever sends you? It might not seem like a couple of little pictures take up much room on your iPhone, but over time all of those images can accumulate and take up precious storage space.

Basically, what Magic Cleaner for WhatsApp does is that it identifies and helps you delete junk images in WhatsApp that you don’t really need. It finds these photos automatically for you, but you can always look them over before you confirm that Magic Cleaner can delete them all for you. It’s very convenient.


Key Features:


It’s a convenient app that you can download straight onto your iPhone.


It will automatically find junk images that you don’t need.


It allows you to remove the images at your discretion.

Basically, it’s a great tool to have if you want to save WhatsApp space on your iPhone.
Test & Review

Magic Cleaner is easy to use and works fairly quickly. It’s also good at finding the photos that you don’t really need, such as the screenshots and memes that are just taking up space in your storage. The interface is easy enough to use, and you can even select junk photos individually to send them to the trash. It was all a very intuitive process that only takes a few taps to accomplish.
Pros:


Easy to use, simple interface.


Automatically choose junk files for you.


Save you space.


Can be used easily right on your iPhone; no need for a computer.
Cons:


The iOS version may be difficult to find, and doesn’t appear to be on the official iTunes store currently.


It is not a security-oriented app, which means that the data you delete will not be permanently deleted. Your photos could still in theory be recovered by special recovery software.
Why Magic Cleaner for WhatsApp is Not the Best Choice

There are several reasons why Magic Cleaner for WhatsApp is not the best choice in cleaners out there, but the primary reason is privacy. If you are deleting photos from WhatsApp, it’s good practice to make sure that the data is scrambled and that your photos are permanently deleted beyond recovery.

Magic Cleaner cannot provide this, which is why a different kind of application that puts more of an emphasis on security would be a better choice. This way, even if you lose your iPhone or give it away, no one will know what data you deleted from WhatsApp.Sponsor ads:

Gihosoft Free iPhone Data Recovery:https://www.gihosoft.com/iphone-data-recovery-free.html

Gihosoft iPhone Data Recovery Free

Free iPhone Data Recovery Software for Windows/Mac

Recover up to 12+ types of files, including contacts, SMS, photos, WhatsApp, Viber, notes, etc.

Restore lost data from iOS devices directly or from iTunes and iCloud backup

Recover iPhone data lost due to iOS upgrade/jailbreak, accidental deletion, device lost or broken

Support all the latest iPhone, iPad and iPod Touch

Both Free and Pro version.

If you lost data after you updated to a new iPhone, you can always use Gihosoft iPhone Data Recovery to get the data back from the old iPhone or backup.You may also like: iphonerecovery.com

If you use android phones, please choose Gihosoft Android Data Recovery.

With Gihosoft Android Data Recovery, no longer afraid of data loss!

Must read:Youtube video downloader for pc

Gihosoft RePicvid Free Photo Recovery Software provides a free photo recovery software for windows to help users recover the deleted or lost photo for free.

Jihosoft Android Data Recovery: the best Android Data Recovery software for Windows and Mac to recover deleted contacts, messages, photos, videos, WhatsApp and etc from Android devices.Tips:How to transfer messages from iPhone to iPhone

jihosoft Free iPhone Data Recovery

Thursday, February 21, 2019

How to Recover SMS from iTunes 2019


2 Restore iPhone from an iTunes Backup

Alternatively, you still could restore the iPhone from an iTunes backup and while you can still get your SMS messages back this way, the method is flawed for the following reasons.

Note


Restoring your device essentially erases the device’s contents and settings and could therefore lead to the loss of new data on the device.


The process takes a very long time, time that you will not be using your device.

Here’s how to restore your iPhone from an iTunes backup.

Step 1: Launch iTunes on your PC or Mac and connect the device using USB cables. You may see a message requesting your device passcode or to “Trust this Computer.” If you, follow the on-screen instructions.Gihosoft Free iPhone Data Recovery:iphonerecovery.com

Step 2: Once the device is connected and appears in iTunes, select it and then click “Restore Backup.”


Step 3: Select the most relevant backup by date and size and click “Restore.” When requested, enter a password for encrypted backups and wait for the process to be completed. Keep the device connected after it restarts and wait for it to sync with your computer.


Now you can easily recover deleted SMS messages from iTunes. It is clear that D-Back remains the best solution especially because all other data on your device will remain intact after the recovery process.Sponsor ads:

Gihosoft Free iPhone Data Recovery:iphonerecovery.com

Free iPhone Data Recovery Software for Windows/Mac

Recover up to 12+ types of files, including contacts, SMS, photos, WhatsApp, Viber, notes, etc.

Restore lost data from iOS devices directly or from iTunes and iCloud backup

Recover iPhone data lost due to iOS upgrade/jailbreak, accidental deletion, device lost or broken

Support all the latest iPhone, iPad and iPod Touch

Both Free and Pro version.

If you lost data after you updated to a new iPhone, you can always use Gihosoft iPhone Data Recovery to get the data back from the old iPhone or backup.

Top 10 Best FRP Bypass Tools to Bypass Google Account on Android Device 2019

Worth reading:download youtube 1080p

If you use android phones, please choose Gihosoft Android Data Recovery

Jihosoft Android Data Recovery: the best Android Data Recovery software for Windows and Mac to recover deleted contacts, messages, photos, videos, WhatsApp and etc from Android

Wednesday, February 20, 2019

Top 8 Sites for Unique, Creative, Good Kik Name Ideas 2019


1 Top 8 Sites for Unique, Creative, Good Kik Name Ideas
1. Jimpix

If you want to generate a random username, Jimpix is a great site to start. It offers you different Kik usernames in different categories. It also offers a lot of ways to customize the name for perfection. It’s particularly great when you want something inspirational.
2. SpinXO

Don’t have an idea of what you want your Kik username to be. SpinXO will help you by asking you a bunch of questions. Answer about 2 questions and the site will generate random usernames you can choose from.
3. KidPub

This one has 101 set of random names from which you can choose one. But while it does generate cute usernames, the number to choose from is so low, you may end up with a common username. No one wants that, not when you want to stand out.
4. Kik Login Online

Need just a little bit of help? This one gives you 40 cool Kik names to choose from. But before you scoff at the low number, it does have a cool trick. You can rearrange the words to get a totally unique username.
5. Namestation

While they may not have been very creative with their own site name, this one can help you get a few ideas. Even if you don’t use them, you have somewhere to start.
6. Nickname Generator

Of all the one’s we’ve seen this one requires a little bit of a time investment. But it’s all worth it if you want a totally unique name. Answer 15 questions and one will be generated for you.
7. Funny Usernames Discussion from Killermovies

This one is very specific to the type of clientele. Only go here if you are looking to make others laugh every time they see you on Kik. A funny username is one way to remain unforgettable.
8. Good Kik Names Listed by Appamatix

This one has a long list of thousands of Kik usernames for you to choose from. It may have the largest database yet. Go through most to find one that is as creative as you want to be while remaining true to yourself.1 How to Delete Songs from iPhone (only for songs downloadeded from Apple Music)
(1) From Music App

Step 1: Launch the Music app and click “My Music” from the bottom.

Step 2: You can list sort your songs by Artists, Albums, Songs, Genres, etc. Turn on “Only Offline Music” and it will only show the downloaded music.

Step 3: Find out the songs you want to delete and you will see More (...) icon beside the songs. Click on it.

Step 4: Choose “Remove Download” option to delete it from your iPhone.


Note: You need to delete songs one by one in this way.
(2) From Settings App - For All Music At Once

If you have lots of music on your iPhone, or you want to the slate clean. Then follow the steps below:

Step 1: Open the Settings app

Step 2: Go to General, then Storage & iCloud Usage and then Manage Storage. Wait for it to load then tap on “Music”.

Step 3: Tap “Edit” in the upper right corner.

Step 4: Tap the red minus button next to All Songs or the specific artist, then tap “Delete”.


Note: You can only delete all songs at once or delete all songs in the same artist once. But you cannot delete some specific songs selectively.Sponsor ads:How to Turn off Tumblr Safe Mode without AccountMust Read:If you lost data after you updated to a new iPhone, you can always use Gihosoft iPhone Data Recovery to get the data back from the old iPhone or backup.

Gihosoft Free iPhone Data Recovery:iphonerecovery.com

If you use android phones, please choose Gihosoft Android Data Recovery

Sponsor ads:

Gihosoft Free iPhone Data Recovery:iphonerecovery.com

Free iPhone Data Recovery Software for Windows/Mac

Recover up to 12+ types of files, including contacts, SMS, photos, WhatsApp, Viber, notes, etc.

Restore lost data from iOS devices directly or from iTunes and iCloud backup

Recover iPhone data lost due to iOS upgrade/jailbreak, accidental deletion, device lost or broken

Support all the latest iPhone, iPad and iPod Touch

Both Free and Pro version.

If you lost data after you updated to a new iPhone, you can always use Gihosoft iPhone Data Recovery to get the data back from the old iPhone or backup.

Top 10 Best FRP Bypass Tools to Bypass Google Account on Android Device 2019

Worth reading:download youtube 1080p

If you use android phones, please choose Gihosoft Android Data Recovery

Jihosoft Android Data Recovery: the best Android Data Recovery software for Windows and Mac to recover deleted contacts, messages, photos, videos, WhatsApp and etc from Android


Monday, February 18, 2019

Resolve Frequent iPad Safari Crashes 2019


2 Update Latest iOS System

Besides the junk files and cache, iPad Safari crash may be result of the old version of your operating system. Thus, one of the solution is to update the latest iOS version. Usually, the iPad will receive notifications when new version is available, accept it whenever you see it or go to Settings > General > Software Update.
3 Clean Safari History & Cookies

Additionally, you can stop Safari crashing on iPad by manually deleting your history and cookies within the software. Go to “Settings > Safari > Clear History and Website Data”.
4 Clear Safari Stored Data

Safari stores data in order to keep running. This data may be a cause for the crashes if it is constantly piled up. To do this the steps are similar as the above mentioned. Go to “Settings > Safari > Advanced > Website Data > Remove All Website Data”.
5 Clear & Disable Autofill

The Autofill can not only cause iPad Safari crashes, but it is also a cause for lags. So, the smartest thing to do is to clear and disable it. You can do this in “Settings > Safari > AutoFill”. You can turn Use Contact Info, Names and Passwords, and credit Cards on or off there. If you disable them, it will not automatically fill out web forms.
6 Disable iCloud Bookmark Syncing

Although you think the iCloud may do you good, it can cause crashes and lags. So, the smartest thing is to disable it too. Go to “Settings > iCloud” and turn off “Safari”. Choose “Delete from My iPhone” then.Bonus Tips:
Restoring Lost Photos and Videos from iPhone

If you have deleted some of your pictures or videos from your gallery, then there is a straightforward way to Recover Deleted Files iPhone back.

After you delete the media files from your gallery, be it photos or videos, then you must know that iOS has a feature that the deleted media files doesn’t get deleted immediately, but it gets compiled to a temporary folder from where it gets deleted after 30 days. If you lost data after you updated to a new iPhone, you can always use Gihosoft iPhone Data Recovery to get the data back from the old iPhone or backup. Should you wish to recover these files, you must go to that “recently deleted” folder and retrieve these files before 30 days.

If you use android phones, please choose Gihosoft Android Data Recovery.

Worth reading:Best youtube downloader online download youtube 1080p

Must Read:

How to transfer messages from iPhone to iPhone

Tips:

How to transfer messages from iPhone to iPhone

Must read:icloud activation lock removal

Must read:Gihosoft Free iPhone Data Recovery:https://www.gihosoft.com/iphone-data-recovery-free.html

Should You Upgrade from iPhone X to iPhone 11 Pro?

Now that the iPhone 11 Pro is out, many iPhone X owners are wondering if they should upgrade to it or not. If you are in a similar dilemm...