Thursday, November 8, 2018

Upgrade RAM on 2018 Mac mini in 11 Easy Steps 2019


When Apple first unveiled its 2018 refreshed Mac mini lineup last month, it highlighted the fact that it came with SO-DIMM RAM. This meant that the RAM was not soldered on the mainboard and that user replacement/upgrade was possible.

The Mac mini uses DDR4-2666 SO-DIMM which one can easily get from Amazon or any other retailer. Upgrading the RAM manually is going to be a far cheaper route than asking Apple to do the same as the latter will charge users a premium of anywhere between $300 to $500 additional just for upgrading the RAM.

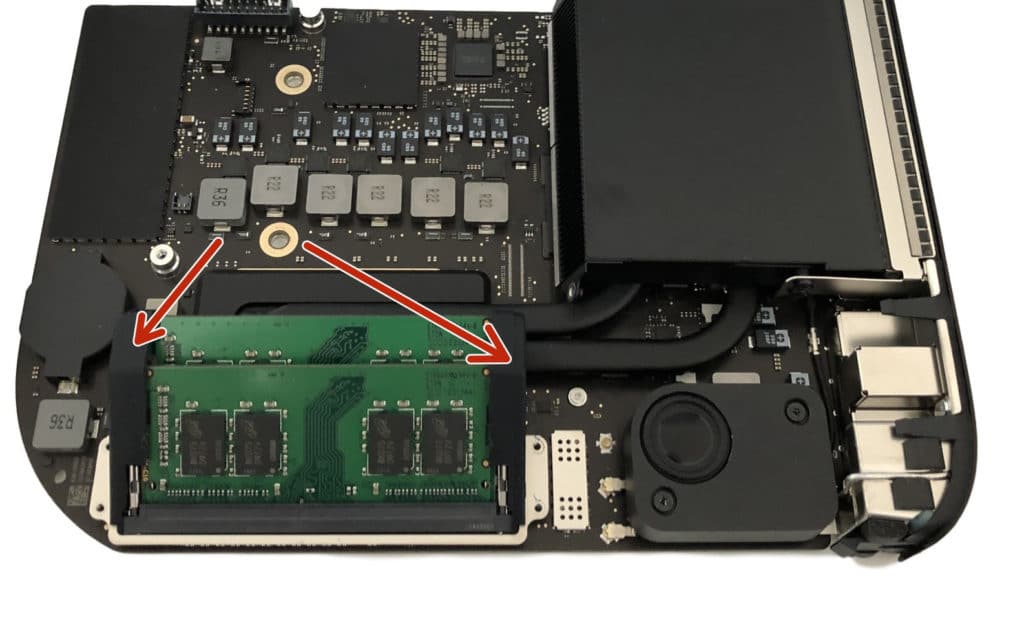
If you plan on buying the 2018 Mac mini and upgrading the RAM yourself, iFixit has now published an 11-step guide which shows how to upgrade the memory on it. The detailed guide should make it easier for anyone looking to upgrade the memory of their Mac mini now or down the line. The process is relatively easy, with iFixit ranking the difficulty as “Easy” and saying the time taken for the whole process will be around 10 minutes.


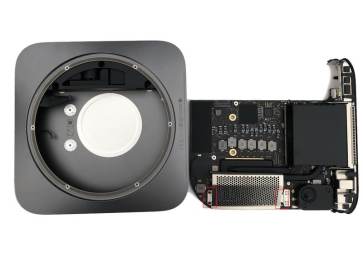
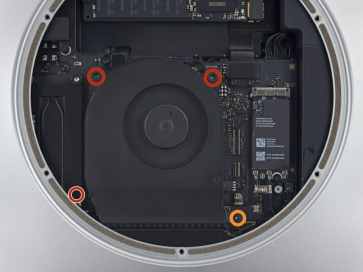
To upgrade the RAM on your 2018 Mac mini, you will have to slide out the logic board from the housing. This is a delicate process as it requires one to disconnect various antenna cables and connectors on the logic board. You will also have to remove the cooling fan during the process.

If you have ever upgraded the RAM or HDD/SSD of your previous Mac mini, you will find the steps to be remarkably similar. If you are new to the whole process though, follow the iFixit guide closely and make sure to have access to all the tools beforehand. And if you are still not confident enough of doing the job yourself, you can always take your Mac mini to a third-party repair shop who will charge you a small fee for the upgrade.If you lost data after you updated to a new iPhone, you can always use Gihosoft iPhone Data Recovery to get the data back from the old iPhone or backup.

[Via iFixit]

Wednesday, November 7, 2018

How to Set Your iPhone to Erase All Data After 10 Failed Attempts 2019


How to Set Your iPhone to Erase All Data After 10 Failed Attempts

It’s no gainsaying that Apple has done a magnificent job with the security of iPhone. So if you have some files that you want to keep it private and don’t want anyone to see it, you can put a password on the iPhone to make sure no one else can access it without you knowing, and you can even set your phone to erase all data after 10 failed passcode attempts. Though it means you will have to start all over again, it is a sure way to save your files. Question is, how do you set your iPhone erase data after 10 attempts.

How to Set Your iPhone to Erase All Data After 10 Failed Attempts

Step 1: Go to the Settings on your iPhone.

Step 2: Scroll down till you see the Touch ID and Passcode option.

Step 3: Click on it and you will see the Erase Data option at the bottom of your iPhone screen, just enable it and it's done.


How to Get Your Data Back after Erasing All Data

Its one thing to be able to set your iPhone erase data after 10 attempts, but the question is, how do you recover your data after it seems to have been deleted? There are basically two ways to recover your data back if you have backups.You may also like:iPhone Backup Extractor - Extract Data from iPhone Backup

1 iCloud

If you have backed up in iCloud, then you can get your data back from iCloud:


On your iPhone, go to Settings.


Click on “your name” then iCloud followed by clicking on Storage.


Then go to Manage Storage (or Settings) à iCloud, and go to Storage and Manage Storage.


You can then tap a device that’s been listed under Backups to check for the date and size of its latest backup, you just have to make sure you have a file that you’ve backed up recently, if yes you can restore them.


2 iTunes

If you have backed up in iTunes, then you can get your data back from iTunes:


For iTunes users, open the iTunes software on your Mac or PC that you’ve used to back the files up.


Next, connect your iPhone to your computer by using a USB cable. Make sure you trust your device while at that.


You should select your iPhone immediately it appears on iTunes.


Select the ‘Restore Backup’ in iTunes.


You can then check out the date and size of each of the backup and pick the relevant one amongst all of them.


Finally, click the restore and wait for the restore time to finish.


If you lost data after you updated to a new iPhone, you can always use Gihosoft iPhone Data Recovery to get the data back from the old iPhone or backup.


Should You Upgrade from iPhone X to iPhone 11 Pro?

Now that the iPhone 11 Pro is out, many iPhone X owners are wondering if they should upgrade to it or not. If you are in a similar dilemm...