Wednesday, March 13, 2019

Apple Suppliers Preparing for Mass Production of AirPods and New iPads

Apple Suppliers Preparing for Mass Production of AirPods and New iPads


DigiTimes reports that Taiwanese PCB firms Flexium Interconnect and Zhen Ding Technology are gearing up to mass produce Apple’s upcoming iPads, with Compeq Manufacturing and Unitech PCB supplying the flex boards for the AirPods 2.

The report citing sources claims that Apple will be unveiling new iPads and AirPods at its March 25 media event. The report is light on other details, though it does mention that Apple suppliers should see a boost in their revenue with the AirPods 2 launch. This should also help offset the revenue decline they were facing due to a slowdown in iPhone sales.

Multiple rumors have claimed that Apple will be announcing the AirPods 2 alongside an iPad mini 5 and a 2018 9.7-inch iPad successor at the event. However, most reports suggest that Apple will simply put these hardware products on sale right after the March 25 event and won’t talk about them on stage. That’s because the company wants to focus solely on its Apple News Magazines service and TV streaming platform announcement at the Show Time event which will be attended by some high-profile celebrities as well.

This does make sense since none of the hardware products are going to offer any breakthrough feature or bring anything new to the table. While the iPads are going to be primarily about internal refresh, the AirPods 2 is going to come with Always-on Hey Siri and a new surface coating for improved grip.

A rumor from a credible source yesterday claimed that Apple is working on a 10.2-inch iPad 7 alongside a non-Pro 10.5-inch iPad. So, it now remains to be seen if the upcoming iPad from Apple will feature a 9.7-inch or a 10.2-inch display as contradictory rumors have claimed.

[Via Digitimes]Also Read:Windows 10 Blue Light Filter: Learn Something about Your Eyes Saver
Also Read:5 Best ExtraTorrent Alternatives after ExtraTorrent Shut Down Permanently 2019!

Apple Music Now Available on Amazon Fire TV


Amazon today expanded its Apple Music integration to the Amazon Fire TV, allowing Fire TV owners to ask Alexa to play songs from the Apple Music service.


According to CNBC, Apple Music on the Amazon Fire TV is available starting today.


The expansion comes three months after Apple allowed Apple Music to be streamed on Amazon Echo speakers using the Alexa voice assistant.


On the Fire TV, users can use commands like "Alexa, play music by Stevie Nicks," or "Alexa, play a Fleetwood Mac album" to play content directly from Apple Music.


It can be enabled by going to the Alexa app on an Android or iOS device and activating the Apple Music skill. Those who have already set up Apple Music with Alexa for Echo devices will not need to repeat the steps.


Right now, Apple Music is limited to the Fire TV and Amazon Echo speakers, though it may be expanded to third-party Alexa devices in the future.


Apple's effort to allow Apple Music to be streamed on third-party platforms is part of a deeper push to grow services revenue. Apple is also planning to expand iTunes to Samsung Smart TVs in the form of an iTunes app, and AirPlay 2 functionality is being built into recent smart TV sets from a number of manufacturers like Sony and LG.Also Read:Windows 10 Blue Light Filter: Learn Something about Your Eyes Saver


Also Read:5 Best ExtraTorrent Alternatives after ExtraTorrent Shut Down Permanently 2019!

Sunday, March 10, 2019

10 Really Useful iPhone Apps Every User Needs 2019


The App Store is filled with amazing apps. And it can be overwhelming scrolling through the millions of apps, trying to decide which app is worth installing. Let’s start from step one. We’re here to talk about some really useful iPhone apps you should be using.

We use the iPhone to communicate, socialize and get work done. And we should have the right toolset to help us out. We’ve outlined ten iPhone utilities that will help you be more productive on the iPhone.
10 Really Useful iPhone Apps Every User Needs
1. Gboard


Gboard is the best third-party keyboard app for iPhone. Even if you don’t use it the whole time, it’s a good utility to keep installed on your iPhone.

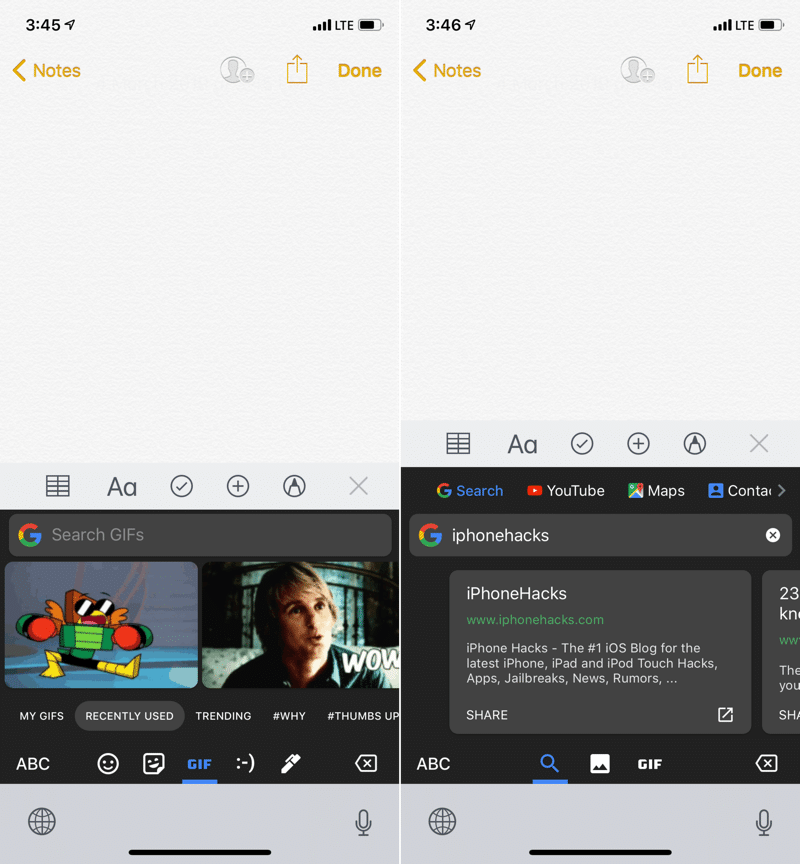
Gboard comes with auto-complete, gesture typing, Emoji suggestion, GIF search and more. The best feature is the built-in Google search. Tap on the G button, search for something and you can filter through results and paste in a result directly from the keyboard.

Usually, you need to open Safari to Google and find something. If you have Gboard installed, you can do all of that without leaving the conversation. Install Gboard and switch to it whenever needed. Gboard also has a beautiful dark theme (and you can create your own themes if needed).

Download: Gboard (Free)
2. VLC


VLC is the path to a different viewing experience for your videos and movies. VLC media player can play all movies, TV shows, and all your videos. The most eye-catching feature of it is that you can watch all your media without any conversion or processing.

The app is completely free for iPhone and is an open source app. The other important features are file synchronization with Dropbox, iCloud Drive, iTunes etc. Getting content in and out of VLC is very easy. You can wirelessly transfer any media from another iOS device or from your computer using Wi-Fi transfer. VLC also works with any media servers that you have running (like Plex).

Download: VLC (Free)
3. Shortcuts


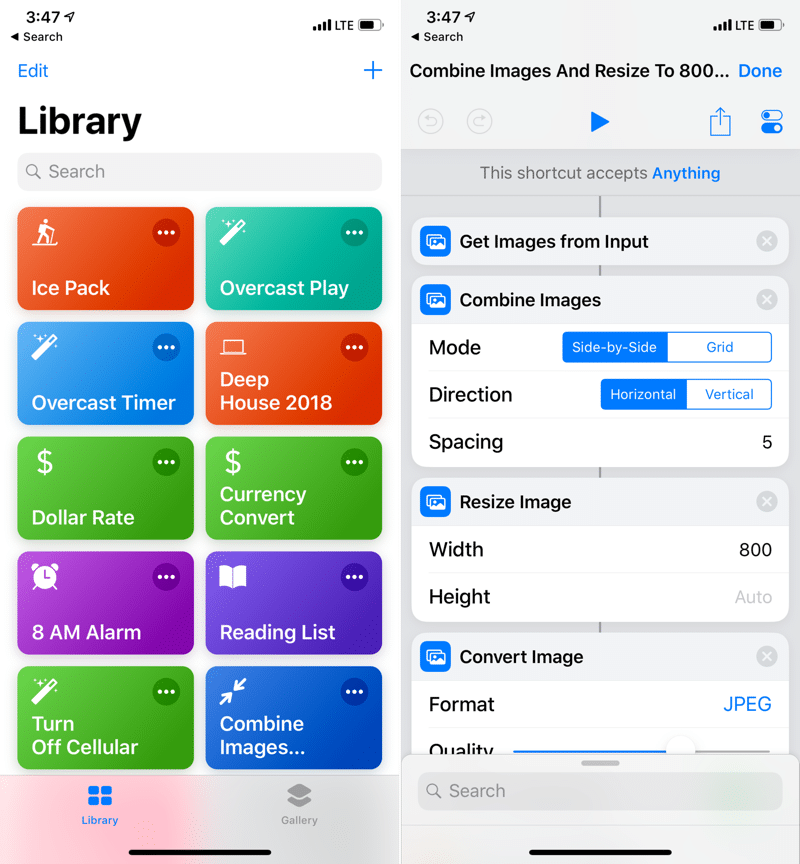
You can’t talk about basic iPhone utilities without mentioning Shortcuts. Shortcuts finally brings user-defined automation to iPhone. This iOS 12 app comes from Apple itself. You can create some really cool things using this nifty app.

You create simple shortcuts which are just a list of one action after another. Then when you initiate a shortcut, iOS will run all the actions for you.

This is a good way to automate simple or complex tasks you do every day. Something like turning on Airplane mode, Do Not Disturb and starting a podcast with just one tap. And because this is Apple’s own app, it integrates with Siri as well. So you can initiate shortcuts simply using your voice.

You can start with simple and take it all the way to complex. You can use loops and smart variables to create complex shortcuts that work dynamically based on the input. The app features hundreds of actions and you can add thousands more using third-party apps. Check out our guide on how to create your own shortcuts to get started.

Download: Shortcuts (Free)
4. Zones World Clock


Currently, Zones is the most intuitive world clock app on iPhone. It takes a complex concept like time zone conversion ands implies it by presenting data in a visual manner. The app has been updated to enable quick interactive conversion.

Start by adding different cities and time zones. Then you can see the time for all cities together in a list, even in a widget. The best thing is that you can change the time in one city and then see what time it will be in all the other cities. For example, you can change the time in London to 5 PM and instantly see what time it will be in other added cities like San Francisco, Tokyo, New Delhi and so on.

Download: Zones World Clock (Free)
5. Documents by Readdle


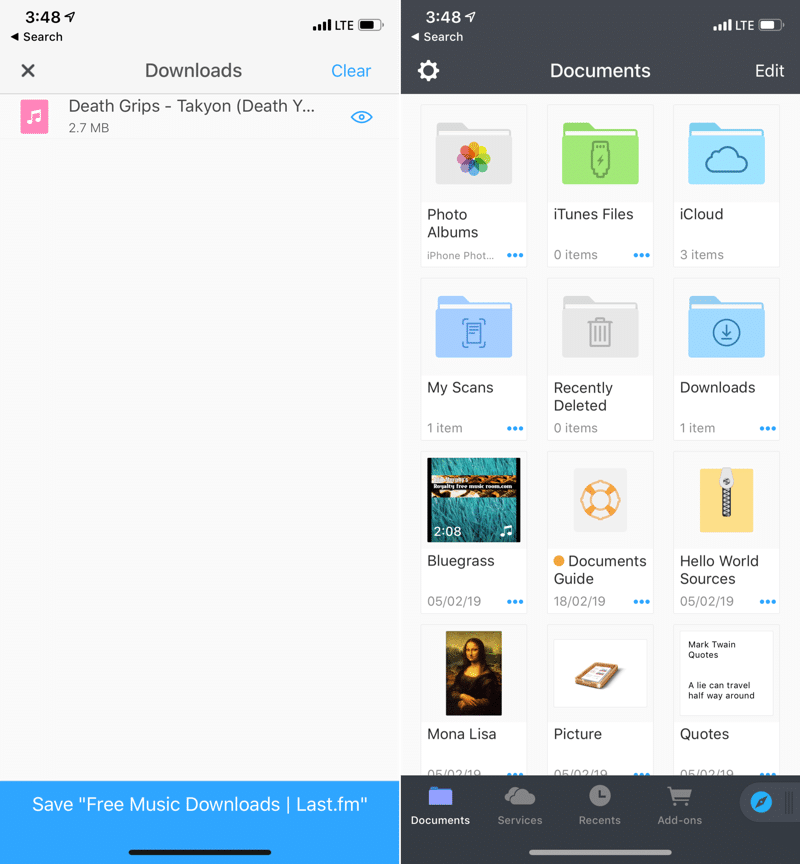
This app is the mecca of all your files. It’s what the Files app in iOS 11 should have been.

You can read, listen, view and store all the required data and work on your iPad or iPhone. The app is a handy tool and helps you to store your data in an organized manner. The app is super quick and can be used easily.

Documents is the only feature rich downloader on iOS that is not plagued by ads. iOS as you know, doesn’t have a download manager. So you can use Documents to download music, documents, and videos to your iPhone. Then you can organize and play the content in the app itself. If you want, you can export downloaded content to a third party app like VLC as well.

Download: Documents by Readdle (Free)
6. Xe Currency


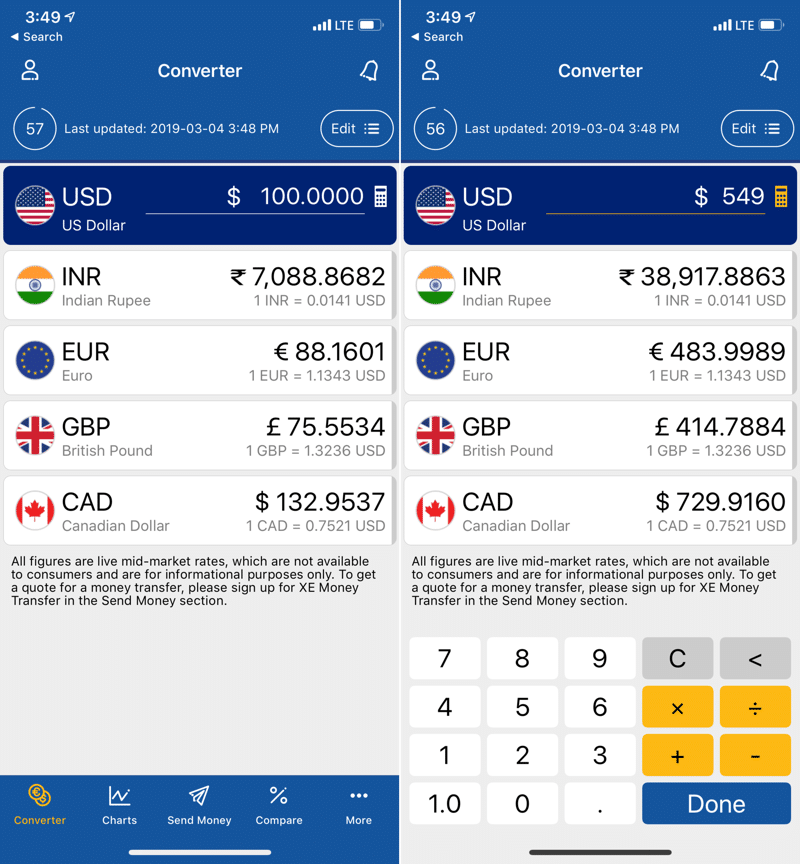
This app provides you with all world currencies at your fingertips. This app since a long time connects customers through reliable currency exchange rates and provides them with various charts.

It provides you with access and monitor all the world currencies according to your choice. It’s an easy to use and with a simple calculator for conversions. Xe Currency also works on the Apple Watch.

Download: Xe Currency (Free)
7. Fantastical 2


If you live inside your calendar, you need to buy Fantastical 2. If you live and breathe for work, appointments and meetings this app is built for you. It offers you to view your calendars and reminders in a simple manner.

Fantastical’s natural language input is the best in business. You can just type out the appointment with a title, place, date and time and the app will automatically file all the relevant information for you. What would take at least 7 taps in the calendar app, takes just one sentence and a single tap in Fantastical. The app’s gesture-based interface is intuitive and fast to use.

It also has a feature to add an event on the calendar just by talking to Siri. The app has an attractive view and all the meetings and appointments for the day or the week can be lined up in a very systematic fashion. The reminders of the app are very useful and it will never allow you to miss any important meeting. The best thing about this app is that it can be synced with your Apple Watch and can be viewed on it as well.

Download: Fantastical 2 ($4.99)
8. Drafts 5


Drafts is designed to quickly convert thought into text, and then action. Just open the app, from the widget or the Home screen and start writing. Doesn’t matter what it is. It can be a note, a list or even an email.

Later, you can decide what to do with it. Drafts comes with a huge collection of extensions that will help you send the data to the relevant app with just a tap.

Download: Drafts 5 (Free)
9. Copied


Copied is the best clipboard manager for iPhone, iPad, and Mac. It works seamlessly across all Apple devices.

This app allows you to save data so that you can easily find them when you need them. It allows you to save texts, links, and images from any apps as clippings. It allows you to improvise on your clippings with the help of text snippet formats of our own. The app also has an automatic browser which can enable to save the data which has been directly copied from a particular web page. It allows you to save and organize unlimited data according to your need with the help of lists.

But as this is iOS, you’ll need to manually add the clipboard to the app. Just add the Copied widget and use the + button to add the current data (text, link or image) directly to Copied.

Download: Copied (Free)
10. TickTick


TickTick is the most approachable to-do list app on iPhone that also offers all the important productivity features. If you find the Reminders app to simple to use, take a look at TickTick. The UI is easy to use, plus you can use natural language to create tasks. So you can say “Physio appointment downtown at 4 PM on Saturday” and the app will create the appointment with the date and time data as well. And by default, you’ll be reminded automatically 30 minutes before the event.

This app allows you to schedule your agenda, make notes and can share various things with your family through this app. This app has a very good cloud syncing across all Apple devices.

The app supports multiple reminders, checklists, collaborating and a quick search for all tasks.

The free version is going to be enough for most users. But you can pay for premium and remove all limits for creating tasks and subtasks.

Download: TickTick (Free)
Your Favorite Useful iPhone Apps

What are some of your favorite iPhone apps that you think every iPhone user should be using? Share with us in the comments below.Also Read:How to Fix Windows was Unable to Format SD Card/USB Drive
Also Read:SWF to MOV – How to Convert Flash SWF to MOV
Also Read:Whatsapp Text Tricks: Type Bold, Italics & Strikethrough WhatsApp Texts on iPhone
Also Read:How to Recover Deleted Photos from Samsung Galaxy Note
Also Read:Top 8 Best Alternative Websites to MamaHD 2019

Friday, March 8, 2019

How To Enable Slow Motion In Any Android Device

How To Enable Slow Motion In Any Android Device

So, what to do if your inbuilt camera app doesn’t have a slow-motion video feature? Well, don’t throw your smartphone away for this very reason as there is a number of third-party slow motion video apps on the Google Play Store that will help you to take a perfect slow-motion video on your Android device! So, if you are interested in this feature, read on as we show you the steps on how to enable slow motion in any Android device.


How to enable slow motion in any Android device:

Well, even though there is a number of third-party apps that perform the very same function. We in this article have mentioned the steps for the Slow Motion Video FX application. As it is undoubtedly one of the best application for easily turning a normal video into a slow-motion one. Or even for creating a stunning slow motion video!


Install and open the Slow Motion Video FX application from the Google Play Store.


Once opened, you will get two options, Record movie or Choose a movie. In this step, you need to choose whether you want to record a new video or apply slow motion effect to an already existing video.


If you clicked for the first option i.e “Record movie”, the camera of the application will get open. So, now to shoot the video in slow motion tap on the big red button which will be in the middle of the screen. And your recording will get started. Once you are done with your recording, tap on the “tick mark” option and wait a while till the video is being processed.


Now comes the little tricky part, but don’t worry you will be fine. After your video is being processed you will then see the tutorial on how to make your normal video a slow-motion one. So, basically, the editing screen is divided into two parts by a faint line. There are two dots in the middle which mark the start and the end of your effect. You can slide the dots up and down to change the speed of the video. To enable slow-motion video, make sure that both the dots are below the partition line. The closer the dots are to the bottom, the slower will be the video. And vice versa, if the dots are moved up from the faint line, the video speed will get faster then the normal speed.


Once you are done with your editing, tap on the green “Save” button from the upper right corner. And your video will get saved.


But if you want to edit your already made video then click on the “Choose movie” option and select the video that you want to edit. Then just follow the same above steps and your new edited slow motion video will get ready.

That’s it, just with the above steps anyone can take a slow-motion video on their Android device without any hassle. And the best part of this application is that it not only enables you to directly capture a slow-motion video. But you can also edit an already made video with equal ease. Also, the controls of the application are very simple to use. Just control the speed of the video by lowering or highering the dots and you are good to go.
Related Posts:


How To Share Your Instagram Story On Facebook


How To Edit Any Photo Like a Pro

So, if this article helped you then do share it on social media with your friends. And also mention your views in the comment box down below.
Also Read:How to Fix Windows was Unable to Format SD Card/USB Drive
Also Read:SWF to MOV – How to Convert Flash SWF to MOV
Also Read:Whatsapp Text Tricks: Type Bold, Italics & Strikethrough WhatsApp Texts on iPhone
Also Read:How to Recover Deleted Photos from Samsung Galaxy Note


Also Read:Top 8 Best Alternative Websites to MamaHD 2019

Monday, March 4, 2019

Something about Encrypted Backup You Should Know


Something about Encrypted Backup You Should Know
Difference Between Encrypted and Unencrypted iTunes Backup

The key difference between encrypted and unencrypted iTunes backup is that encrypted backups lock and encode your information. What's more, encrypted backup includes some info that unencrypted backup don't:


Your saved passwords


Website and browsing history


Wi-Fi settings


Health data
How to Encrypt iTunes Backup?

The steps to encrypt iTunes backup is straightforward:


Connect your iPhone to your computer via compatible USB cable. Then launch iTunes and select your iPhone in iTunes from the upper-left corner of the interface.


Next, navigate to Summary > Backups section and then find and click on "Encrypt [device] backup" option.


Now you will need to set a password for encryption/decryption. Follow the on-screen instructions to set the password. Once you have confirmed your password, iTunes will start the backup process.


How to Check If Encryption Backup Process is Completed?

It is recommended that you make sure that the encryption backup process is completed successfully. Follow these instructions:


On your Windows PC, navigate to Edit > Preferences in iTunes.


Then click on the Devices tab. There, you should see a lock icon next to your device's name, as well as time and date that the backup was created by iTunes. It is an indication that the backup is encrypted.


Conclusion


Sponsor ads:Windows Media Player Won’t Play AVI Troubleshooting
Sponsor ads:Calendar Apps for iPhone in 2019 – Manage Your Schedule


Sponsor ads:Clear Call Log on Android

Fix the Issue of ‘Apple TV Stuck in Recovery Mode’ 2019


Many Apple TV users have complained about the refusal of their Apple TV to boot normally, and it is showing “connect to iTunes screen.” This usually occurs after restore, jailbreak, recovery mode or restart. Fortunately, if your Apple TV has any of these problems, we have put together some tips that can help you fix the issue of “Apple TV stuck in recovery mode.”


Way 1: Put your Apple TV to Sleep


Sponsor ads:MBR vs GPT: Which One is Better?Sponsor ads:Download Twitch Videos for Free
Way 2. Turn off and Turn on the Apple TV


Way 3: Restore Apple TV with iTunes


Way 4. Exit Recovery Mode with the Best Apple TV Recovery Tool
Way 1: Put Your Apple TV to Sleep

You can get your Apple TV out of recovery mode by putting it to sleep and then removing USB and powering it up with a power cord.

For 3rd generation Apple TV or earlier models: To put your Apple TV to sleep, press and hold the Play/Pause Button for some seconds. This makes the light on your Apple TV go off. Turn it back on by plugging the power cord back to your TV. Follow these steps to put your Apple TV to sleep or wake it up. This applies to 3rd generation Apple TV or earlier models. By leaving your Apple TV inactive for some time, your Apple TV will go to sleep by itself. You can also use your remote to put your Apple TV to sleep from the menu.

For 4th Generation Apple TV: Press and hold the button with the TV icon on your Apple TV Remote or Siri Remote for five seconds. From the menu option, choose sleep or go to “Settings” and select “Sleep Now.” To wake your Apple TV, press any button on your remote.
Sponsor ads:iPhone/iPad Keeps Restarting? Here’s the Fix!Sponsor ads:Set Spam Filter on iPhone to Stop Junk Mails and Texts


Way 2. Turn off and Turn on the Apple TV

If your Apple TV is stuck in Recovery Mode, you will not be able to restart your Apple TV from settings; therefore, the only option you have is to use your Apple Remote to restart your Apple TV by pressing and holding a few buttons.

How to Force Restart 4th Generation Apple TV


Press and hold the menu button and home button at the same time until the light on the Apple TV starts flashing.


Release the buttons.

How to Force Restart 3rd Generation Apple TV or Apple TV that comes with Aluminum Remote


Press the Menu button and Down button simultaneously until the LED light on your Apple TV starts flashing.


Let go of both buttons.


Way 3: Restore Apple TV with iTunes

If you are carrying out a software update on your Apple TV and it fails, unplug the TV from power and plug it back in. Retry the update and if it remains unsuccessful, follow the steps below to restore your Apple TV.

For 4th Generation Apple TV, below are the things you will need to restore your Apple Tv stuck in Recovery Mode;


A Windows PC or MacBook with the latest version of iTunes installed on it.


Fast internet connection.


USB-C cable.

Now, let’s check out the steps.


Remove the power cord and HDMI cable from your Apple TV.


Launch the latest version of iTunes.


For 4th Generation Apple TV, connect a USB-C cable while for a 3rd Generation Apple TV or earlier, connect a Micro-USB cable. Make sure you use the right cable for your Apple TV model.


Connect the other end of the Micro-USB cable or USB-C cable to your MacBook or Windows PC. Also, make sure not to plug lightning to USB cable to your Apple TV.


For 2nd Generation Apple TV, do not connect to the power outlet while for 3rd or 4th Generation Apple TV, plug the power cord to the power outlet.


In your iTunes software, go to the Apple TV summary page. If you do not see this, click on the Apple TV icon located at the upper-left corner of the screen.


Click on “Restore Apple TV.”


Keep your internet connection on, and do not unplug your Apple TV or your computer during the restore process.


After the restore process, disconnect the USB cables and power cord (if connected) and reconnect your Apple TV to the HDMI cable and power cord.


Way 4. Exit Recovery Mode with the Best Apple TV Recovery Tool

Also Read:jihosoft Free iPhone Data Recovery

Sponsor ads:

Gihosoft Free iPhone Data Recovery:https://www.gihosoft.com/iphone-data-recovery-free.html

Gihosoft iPhone Data Recovery Free

Free iPhone Data Recovery Software for Windows/Mac

Recover up to 12+ types of files, including contacts, SMS, photos, WhatsApp, Viber, notes, etc.

Restore lost data from iOS devices directly or from iTunes and iCloud backup

Recover iPhone data lost due to iOS upgrade/jailbreak, accidental deletion, device lost or broken

Support all the latest iPhone, iPad and iPod Touch

Both Free and Pro version.

If you lost data after you updated to a new iPhone, you can always use Gihosoft iPhone Data Recovery to get the data back from the old iPhone or backup.You may also like: iphonerecovery.com

If you use android phones, please choose Gihosoft Android Data Recovery.

With Gihosoft Android Data Recovery, no longer afraid of data loss!

Must read:Youtube video downloader for pc

Gihosoft RePicvid Free Photo Recovery Software provides a free photo recovery software for windows to help users recover the deleted or lost photo for free.


Jihosoft Android Data Recovery: the best Android Data Recovery software for Windows and Mac to recover deleted contacts, messages, photos, videos, WhatsApp and etc from Android devices.Tips:How to transfer messages from iPhone to iPhone

Sunday, March 3, 2019

How to Import Music to iPhone with iTunes


How to Import Music to iPhone with iTunes

It is important to note that iTunes only perform a one-way synchronization. This means, if you are successful in synchronizing and importing music to your phone, any other music files in the phone that are not on the computer will be automatically deleted. Be sure to back them up on email or with a friend’s phone if you value them highly to lose them.


Open iTunes; please check you must have the latest version.


Connect your iPhone to the computer using the suitable cable.


From the iTunes menu, select Music.


Choose the song you want to transfer and drag it to your iPhone.


If you cannot manually add songs to your iPhone, click on your device icon.


Go to Summary, check "Manually manage music and videos" and Apply.


To conclude, Using iTunes to sync music may erase previous data while syncing. TunesMate can selectively transfer music to your iphone easily with no data loss. So, just try TunesMate to make your music transfer without any hassel.Sponsor ads:

Gihosoft Free iPhone Data Recovery:https://www.gihosoft.com/iphone-data-recovery-free.html

Gihosoft iPhone Data Recovery Free

Free iPhone Data Recovery Software for Windows/Mac

Recover up to 12+ types of files, including contacts, SMS, photos, WhatsApp, Viber, notes, etc.

Restore lost data from iOS devices directly or from iTunes and iCloud backup

Recover iPhone data lost due to iOS upgrade/jailbreak, accidental deletion, device lost or broken

Support all the latest iPhone, iPad and iPod Touch

Both Free and Pro version.

If you lost data after you updated to a new iPhone, you can always use Gihosoft iPhone Data Recovery to get the data back from the old iPhone or backup.You may also like: iphonerecovery.com

If you use android phones, please choose Gihosoft Android Data Recovery.
With Gihosoft Android Data Recovery, no longer afraid of data loss!
Must read:Youtube video downloader for pc
Gihosoft RePicvid Free Photo Recovery Software provides a free photo recovery software for windows to help users recover the deleted or lost photo for free.

Jihosoft Android Data Recovery: the best Android Data Recovery software for Windows and Mac to recover deleted contacts, messages, photos, videos, WhatsApp and etc from Android devices.Tips:How to transfer messages from iPhone to iPhone

jihosoft Free iPhone Data Recovery

Saturday, March 2, 2019

How to Tell if Your iPhone Has a Virus?


How to Tell if Your iPhone Has a Virus?

As mentioned above, making sure that your iPhone is free from viruses is crucial so that you can rest easy knowing that your privacy isn't at risk. The most important step is to find out that your iPhone has a virus. There are a number of symptoms that indicate the presence of the virus in an iPhone. Read below to learn about how to tell if iPhone has virus.

Following are some symptoms of an infected device:
Data Usage

If your data usage is higher than usual and the data is depleting rapidly, then it may be a sign of the virus in your iPhone. Viruses run in the background and also communicate with the internet which ultimately leads to increased data usage. It could cost you a lot of money particularly if you don't have an unlimited data plan. This is because all your data is wasted by the virus and you have to buy extra data in order to continue using the online services.
Crashing Apps

Apps on your iPhone aren't supposed to crash unless there is a problem. If your apps have suddenly started crashing, then it could very well be due to the presence of the virus in your iPhone. This is because most viruses temper with the regular operations of the device and cause the apps to crash without explanation.
Pop-ups

A lot of websites have pop-up ads. However, if your iPhone is infected, then you will start seeing pop-ups all the time, especially for services or products that seem suspicious. If that is the case, then you should check for a virus. It is also recommended that you don't click on the links shown in the pop-up ads. These ads are designed to infect your device and make it even sicker.
Unexplained Charges Also Read:SWF to MOV – How to Convert Flash SWF to MOV

Crashing apps and ads are annoying but unexplained charges and mysterious billing are worse. If your iPhone is infected by virus, you will start to find unusual charges particularly in the 'SMS' category. This is because most malware and viruses send messages to premium-rate numbers.
Battery Drain

Since the virus runs in the background all the time, it consumes a lot of resources. This leads to increased battery drain because your iPhone is using more data and CPU. Like actual viruses, malware is also heavy on the device's resources and can leave your iPhone's body completely exhausted. It is recommended that you check battery usage of your iPhone and find out which apps are using the most power. If you see an unfamiliar app using the battery, uninstall it immediately.
Best iPhone Virus Removal
Also Read:How to Recover Deleted Photos from iPhone Xs/8/7/SE/6S/6/5S/5C/5/4S
Also Read:How to Duplicate Snapchat on iPhone in 2019 (iOS 12 Supported)
Also Read:Best Free Partition Manager Software for Windows


How to Transfer iTunes Library to Another Computer with Migration Assistant


How to Transfer iTunes Library to Another Computer with Migration Assistant

In this method, you can migrate all information related to your user accounts, which may include email messages, files, calendars and contacts from your PC to a Mac. But before you proceed with it, make sure you have


Windows Migration Assistant for OS X El- Capitan or earlier


Windows Migration Assistant for macOS- Sierra or later

Once you install Windows Migration Assistant, open it and it will guide you through the process easily.


Launch Migration Assistant and choose "From a Mac, Time Machine backup, or startup disk", click Continue.


On Old Mac, Choose "transfer to another Mac", on new Mac, choose the appropriate icon when prompted.


Select the files you want to transfer and it will take a few hours to finish.


Method 3: How to Transfer iTunes Library to Another Computer with iTunes Backup

You can manually move your iTunes library to your new computer using iTunes backup on an external drive, but, for that, ensure you have the latest version of iTunes already installed. While iTunes backup includes nearly all of the device's settings and data it doesn't include:
Also Read:How to Recover Deleted Photos from iPhone Xs/8/7/SE/6S/6/5S/5C/5/4S
Also Read:How to Duplicate Snapchat on iPhone in 2019 (iOS 12 Supported)
Also Read:Best Free Partition Manager Software for WindowsAlso Read:SWF to MOV – How to Convert Flash SWF to MOV


Content synced from iTunes, videos, photos, books and imported MP3s or CDs.


Photos stored in the cloud like iCloud Photo Library and My Photo Stream.


Content from App Stores and iTunes, or directly downloaded PDFs to iBooks.

Simply follow the steps below, you can transfer iTunes library to another computer.


Find the backup location of iTunes library:


On Windows: \Users\username\My Music\iTunes.


On Mac: Go > Music folder


Open the folder, copy the files to an external drive, and connect a new computer to copy them in the iTunes backup folder of another computer.


You may also like:Sponsor ads:

Gihosoft Free iPhone Data Recovery:https://www.gihosoft.com/iphone-data-recovery-free.html

Gihosoft iPhone Data Recovery Free

Free iPhone Data Recovery Software for Windows/Mac

Recover up to 12+ types of files, including contacts, SMS, photos, WhatsApp, Viber, notes, etc.

Restore lost data from iOS devices directly or from iTunes and iCloud backup

Recover iPhone data lost due to iOS upgrade/jailbreak, accidental deletion, device lost or broken

Support all the latest iPhone, iPad and iPod Touch

Both Free and Pro version.

If you lost data after you updated to a new iPhone, you can always use Gihosoft iPhone Data Recovery to get the data back from the old iPhone or backup.You may also like: iphonerecovery.com

If you use android phones, please choose Gihosoft Android Data Recovery.

With Gihosoft Android Data Recovery, no longer afraid of data loss!

Must read:Youtube video downloader for pc

Gihosoft RePicvid Free Photo Recovery Software provides a free photo recovery software for windows to help users recover the deleted or lost photo for free.

Jihosoft Android Data Recovery: the best Android Data Recovery software for Windows and Mac to recover deleted contacts, messages, photos, videos, WhatsApp and etc from Android devices.Tips:How to transfer messages from iPhone to iPhone

jihosoft Free iPhone Data Recovery

Should You Upgrade from iPhone X to iPhone 11 Pro?

Now that the iPhone 11 Pro is out, many iPhone X owners are wondering if they should upgrade to it or not. If you are in a similar dilemm...