Friday, September 28, 2018

Fix Software Update Is Required to Connect to iPhone Error


The Update Can’t Be Installed? What To Do Now?

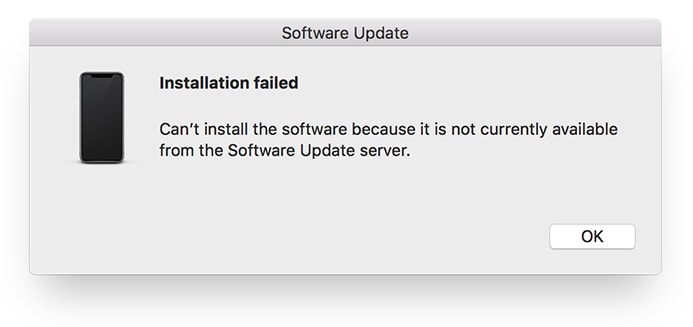
Sometimes you won’t be able to install the updates due to preselected options related to software update options. You can see the message “installation failed – Can’t install the software because it is not currently available from the software update server” and it can be difficult to update your OS version. So, in this condition don’t panic and concentrate on some useful solutions. Maybe your iPhone is in developer beta or public beta software state which require you to make your iPhone officially supported for new updates. When you are using beta software on your iPhone, you can’t merely update your Operating system version.


You need to install iOS beta, and therefore you have to install Xcode beta on your Mac. After this, there may need to sync your iPhone with iTunes again. In below, you can read the complete process of installing the Xcode Beta on your Mac. Although these steps will take considerable time, but you can complete the process efficiently. You don’t need to be a programmer to understand and follow the following steps.
How to Install the Xcode Beta on Your Mac

You can download Xcode from App Store free of cost. It is an integrated development environment for developers of iOS and Mac apps.


You need to get the beta version of Xcode by visiting the link, developer.apple.com/download. You need to provide your Apple ID.


After the above step, you will see a list. You need to choose the latest Xcode beta, and click on “Download” button. The downloading will start in a few seconds.


After completion of the download, you will notice an XIP compressed file which will be of large size. You must uncompress it.


After extracting the zip file, you will get application file which will be twice the size of compress file. You will get the “Xcode-beta” app after completion of the extraction process.


Now double click on “Xcode-beta” app, you will see “install additional required components.” You have to Click on “Install” begin the installation process.


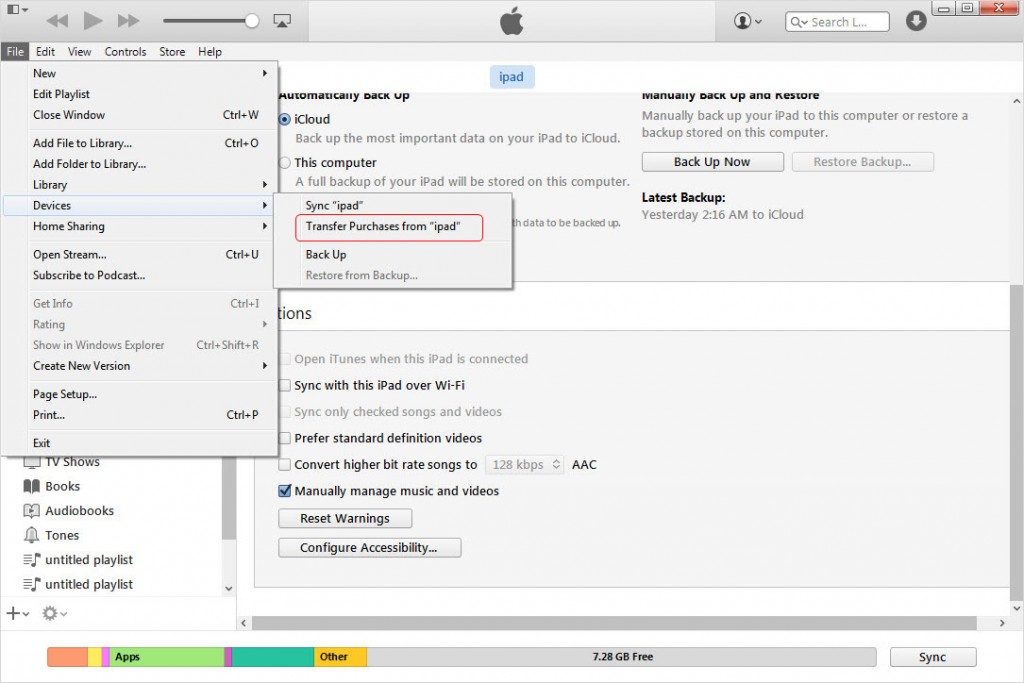
Here one important thing to note that you have to close iTunes before continuing to further processes.


You have to write your password in the required field and submit. This step will also take some time.


Now you will see “Welcome to Xcode” window on your Mac. This indicates that you have done all of the work required.


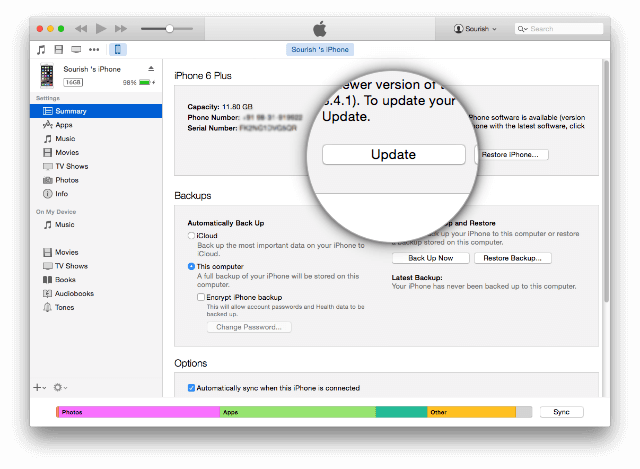
Now you have to quit Xcode and go to open the iTunes. Now you can experience that your iPhone is able to sync and play music and do other tasks.


Fix Software Update Is Required to Connect to iPhone Error
Above are all the steps which you can follow to remove the ‘Software Update Is Required to Connect to Your iPhone.’ Notification. We will advise you to keep installed Xcode on your Mac as you can need it anytime. Once you get the stable release of your installed beta version, you can go to that and can uninstall Xcode from your Mac.Gihosoft Photo Eraser Erase unwanted objects and perfect your amazing photos!


If you lost data after you updated to a new iPhone, you can always use Gihosoft iPhone Data Recovery to get the data back from the old iPhone or backup.


Jihosoft Photo Eraser


Free iTunes/iPhone Backup Extractor for iPhone, iPad


iPhone Backup Extractor - Extract Data from iPhone Backup


Jihosoft Android Data Recovery: the best Android Data Recovery software for Windows and Mac to recover deleted contacts, messages, photos, videos, WhatsApp and etc from Android devices.


Gihosoft Android data recovery Free is a super awesome software specialized in Android file recovery. With this program, you are able to recover deleted photos, music, videos, messages, contacts, call logs, WhatsApp messages, Viber chat history and more from Samsung, Huawei, LG, HTC, Motorola, Google, Oneplus, Sony, Lenovo, ZTE and other Android devices directly.


You may also like:online youtube downloader


Tuesday, September 18, 2018

How to Identify Apps Draining iPhone Battery


Step-by-Step Guide to Identify Apps Draining iPhone Battery

Now that you have access to data from last hour to 10 days, browse around in the section until you find the apps that are draining a lot of your battery. Use both the percentage metric and the background activity stats to figure out which app has been consistently draining your battery.

Step 1: Go to the Last 10 Days section and tap on the Show Battery Usage feature. The app on top here has been draining the most battery over the last 10 days.


Step 2: Switch to the Show Activity option and now you can see which apps have been active the most time. If an app has been using a lot of energy in the background, you’ll find the background time stats to be in hours instead of minutes.


Step 3: To view apps using the most battery life in the last day, switch to the Last 24 hours tab. Again, the app on the top of the list will be the app which drained the most battery life.

In the screenshot below, notice the Google Photos option. It’s has used as much battery life by operating two hours in the background, as Instagram has used by active on screen for 5 hours. Clearly, Google Photos is draining my battery unnecessarily in the background.

Clearly, I’ll have to do something about the background syncing process on Google Photos. If you’re in the similar boat and you can’t just delete the app outright, try disabling Background App Refresh for the given app.


Find Apps That Went Rogue For a While

It happens sometimes. Your iPhone battery will drop by 40% in an hour and you have no idea why. Well, thanks to iOS 12’s new battery charts, you drill down the particular hour where the battery drain happened.

Go to the 24 Hours section and from the Activity graph, pick a bar that corresponds the hour where the battery drain happened. The culprit should be listed at the top.Gihosoft Photo Eraser Erase unwanted objects and perfect your amazing photos!

If you lost data after you updated to a new iPhone, you can always use Gihosoft iPhone Data Recovery to get the data back from the old iPhone or backup.

Jihosoft Photo Eraser

Free iTunes/iPhone Backup Extractor for iPhone, iPad

iPhone Backup Extractor - Extract Data from iPhone Backup

Jihosoft Android Data Recovery: the best Android Data Recovery software for Windows and Mac to recover deleted contacts, messages, photos, videos, WhatsApp and etc from Android devices.
How is Your iPhone Battery Life in iOS 12?

Has the battery life on your iPhone or iPad improved after upgrading to iOS 12? What about the performance? Share with us in the comments below.


Thursday, August 30, 2018

How to Enable, One Handed Keyboard on iPhone Missing or Not Working: iOS 12


Enable, One Handed Keyboard on iPhone Missing or Not Working: iOS 12

Make typing easy and Quick using One-Handed Keyboard mode on iPhone. Users also reported One-handed keyboard make iPhone screen freeze and unresponsive. Otherwise, it’s convenient virtual keyboard that set on screen depend on user’s wish. Also get quicker Fix on After enable Left/ Right handed keyboard is not working/ Missing or cannot use on compatible iPhone models.

The One-Handed mode in iOS 11 is an effortless way to start type text in Messages, Mail, Chat, Notes and more. Here are the troubleshooting steps for One-Handed Keyboard can’t Working on iOS 12.

Right now there are too many third-party one-handed keyboards on the app store but not facilitate like a suitable option given by Apple in iOS 11. Also useful settings for preventing or use the one-handed keyboard on iPhone, iPad using tiny fingers and hand.

A fantastic option for default keyboard quickly enables and convert layout on appropriate design. Let’s see how to use?


Steps for Enable/Turn on One Handed Keyboard on iPhone, iPad: iOS 12/iOS 11

Apple has added a one-handed keyboard option to the iPhone. There are two ways to activate it:

#1: By default this option always available on your keyboard.

#2: See, Long-press on the globe icon or Emoji icon on the keyboard, near to microphone icon. Next, you will see Keyboard position icon (Left, Right keyboard)


How to Permanently Delete History on iPhone or iPad 2018

At last, you will see Keyboard settings in a popup. Tap on it. And jump into Keyboard settings. See screen below,


See One Handed Keyboard > Tap on it and Change Keyboard Layout (Disabled for Turn off, Left and Right).

Disable/ Turn off one-handed keyboard pic center layout in keyboard settings pop-up.

Until you change this setting, it always sees in this handed mode. See Keyboard in full keyboard pane, Tap on Arrow icon, by repeat the same steps.
2nd Method: iPhone One-handed Keyboard not Showing or Disappeared

Important Solution!!!

One Handed Keyboard mode required Display Zoom Off and Set Standard Display mode from the Settings app.

Go to the Settings app on iPhone

Display & Brightness > Scroll Down and Tap on View.


Select, Standard and Save. Changes may affect sleep your iPhone screen.

This happens because of large keyboard layout hide one-handed keyboard view, and the result is unable to activate (Left Handed or Right handed Mode, Two-Handed mode) or disappeared.
3rd Method: Using Settings App, Should not Disabled

Disable One-handed mode from Settings app.

Go to the Settings > General > Keyboard > One Handed Keyboard.

Sometimes, One-Handed keyboard not Showing under Text Replacement. So Follow the 2nd method. And check it again on below screen,


Select Disable.
Fixed: One Handed Keyboard not Activating, Freeze/Closing

#1: Restart or Reboot iPhone

Understandable suggestion some time helpful. By restart or Force Restart you make refresh your iDevice from a root and clear all problems related to memory, Interrupted process and more in a technical manner.

Restart: Press and Hold Sleep/ Wake button until you see the apple logo on the screen.You may also like:Gihosoft Mobile Transfer: 1 Click Data Transfer from Phone to Phone

Force Restart,

For iPhone X, iPhone 8 Plus, and iPhone 8 users:

1: Press and Quickly Release Volume Up button,

2: Press and Quickly Release Volume Down Button,

3: Press and Hold Side Button until you see the Apple logo on Screen.

To Start iPhone, Again press Side button until the startup Apple logo on the screen.

iPhone 7 or later users: Press Sleep Wake + Volume down button, until you see the apple logo on the screen.

iPhone 6S and Earlier users: Press Sleep Wake + Home button.

Also read: How to Unlock a Disabled iPhone Without iTunes.
#2: Check for Update iOS

Fix out general fixes with new updates in iOS 12 from Apple. Check it from Settings > General > Software Update.

Hope you are using the one-handed keyboard without any trouble, Because it’s new and beneficial on big screen iPhone 6, 6 Plus, iPhone 7, 7 Plus and New iPhone 8/ iPhone 8 Plus/ iPhone X.

Free iTunes/iPhone Backup Extractor for iPhone, iPad

Jihosoft iTunes Backup Extractor is a powerful tool to recover and extract important data from iPhone, iPad & iPod touch backup on Windows or Mac.

How to Fix iTunes Error 51


Other Solutions to Fix iTunes Error 51


Some other troubleshooting solutions to this error include:

a.Updating iTunes


If you’re still running an outdated iTunes, then that may be the source of the problem. Why don’t you update it to see if iTunes update or restore error 51 will stop? Updating iTunes on your Mac or PC should be your first troubleshooting technique.


Step 1. Launch iTunes on your Mac or PC.


Step 2. Go to Help, and select “Check for Updates”.


Step 3. If there is an update for your iTunes, download and install it, then try restoring or updating your iPhone again.

b.Check for a Faulty Hardware and Replace It


If you’re using a USB cord to connect to iTunes, check to know if any part of the cord is broken or cut. Also, try the same thing on your USB extension if you’re using one, but if you’re directly using the USB port on your Mac or PC, then try and change to another port to see if iTunes will work.


If any of these connectors are defective, try to change them or switch to another as the case may be.

c.Delete the .ipsw File


The .ipsw file is useful for installing the iOS firmware. Therefore, whenever this file get corrupted by any malware or virus, you’ll start experiencing iTunes error 51. Therefore, delete this file and iTunes will automatically reinstall a clean version of it.


On Mac: Run the following commands “Finder > Go > Go to Folder > type ~/Library and press Go > open iTunes folder > iPhone Software Update and delete the .ipsw files.”


On Windows: Run the following commands “C:\Users\your account\AppData\Roaming\iTunes\iPhone Software Update and delete all .ipsw file. Delete all file if there are more than one .ipsw files.”

Jihosoft Android Data Recovery: the best Android Data Recovery software for Windows and Mac to recover deleted contacts, messages, photos, videos, WhatsApp and etc from Android devices.

Gihosoft Android data recovery Free is a super awesome software specialized in Android file recovery. With this program, you are able to recover deleted photos, music, videos, messages, contacts, call logs, WhatsApp messages, Viber chat history and more from Samsung, Huawei, LG, HTC, Motorola, Google, Oneplus, Sony, Lenovo, ZTE and other Android devices directly. Meanwhile, this Android data recovery software is available for both Windows and Mac platforms.For now, check:Free iTunes/iPhone Backup Extractor for iPhone, iPad

Jihosoft iTunes Backup Extractor free is a powerful tool to recover and extract important data from iPhone, iPad & iPod touch backup on Windows or Mac.

You may also like:Gihosoft Mobile Transfer: 1 Click Data Transfer from Phone to Phone

If you can’t sync with iTunes and want to rescue data from a disable iPhone, you could try Gihosoft iPhone Data Recovery. Also feel free to ask questions on the iDevice is disabled error in the comments section below.

Tuesday, August 28, 2018

Stop Google from Tracking Your Location on Android, iOS and the Web


The Associated Press report reveals that Google may stop storing the data for locations you visit when you turn off location sharing, but several Google apps still store time-stamped location data as default behaviour, without getting user consent. So it’s clear that there’s some data being stored about the places you visit when you open these apps.

If you’re worried about this data being used to show you ads and may even be used by the government, it’s a good idea to turn off all location tracking completely. It must be noted though that you would be breaking a lot of Google services by taking this route, so you won’t be able to use many apps to their full capability. Here are the steps you must follow to stop location tracking and delete existing data:
Stop Google From Tracking You

While we assumed turning off location history was enough to stop tracking, you also need to disable the ‘Web & App Activity’ setting to deny Google access to any and all location data. Here are the steps you need to follow:You may also like:Gihosoft iPhone Data Recovery

Must Read:Gihosoft Free Android Data Recovery

Must Read:Jihosoft iTunes Backup Unlocker

Jihosoft iTunes Backup Extractor free is a powerful tool to recover and extract important data from iPhone, iPad & iPod touch backup on Windows or Mac.

You may also like:

Gihosoft Total Video Converter is a professional all-in-one video tool that enables you to convert videos and audios into various different formats.

You may also like:online youtube downloader

Disable ‘Web & App Activity’ On the Web

1. Open the browser on your desktop or mobile device and navigate to your Google Account via this link right here. Then, click on the ‘Privacy info and privacy’ option.


2. You will need to click the ‘Go to My Activity’ option to view and control all the data Google stores on you.


3. Now, go the ‘Activity Controls’ from the navigation menu on the left.


4. At the very top of the ‘Activity Controls’ settings page, you will find the blue ‘Web & App Activity’ toggle that you have to switch off.


5. When you turn this off, Google will show you a lengthy pop-up warning that you have to delete location data already collected in the past, if you haven’t already done so.


On Android

The process on Android is not all that different and the setting is buried deep in your account setting. Just follow the steps underneath:

1. Navigate to ‘Settings > Google > Google Account’ to access the settings on your Android device.


2. You then need to go to the ‘Data & personalization’ tab for the ‘Web & App Activity’ option that you need to toggle off. You will again be shown a lengthy warning, where you need to tap ‘Pause’ to disable the feature.


On iOS

Since there are no Google system apps on iOS, you won’t be able to simply jump into the device settings and stop location tracking. Each individual Google app, such as Google Search, Chrome, or Assistant, has its own settings page.

You can jump into the settings of each app and find the Google Account settings and then follow the steps described above (see the web section) to reach the ‘Web & App Activity’ option and disable the same.

in addition, you can choose when apps access your location. You can jump into the iPhone’s settings page, scroll down to select an app and change location settings for the same.


We suggest you pick the ‘While Using the App’ option to let apps only access location data when the app is open. This means it won’t be able to pinpoint and send across your location in the background but it’ll still store location data over on Google’s servers. If you want to avoid even this, pick ‘Never’ and you’ll still be able to use Maps but the app wouldn’t be able to get a location lock.

As you can essentially see, we had to dig deep into the Google Account settings to locate and disable the feature. It has been hidden away because it affects major Google services, like the Google Assistant, rendering it useless for the users.
Delete Past Location-Tagged Data

While the above steps will help you block location tracking from your web searches or through other apps, you can choose to delete the data it has already saved by following the steps underneath:

1. You first need to the ‘My Activity’ settings page using this link. This shows all your activity on Google and its linked services, including the location-tagged entries that’ll be denoted with a ‘location pin’ icon at the bottom.


2. Tapping the location pin will show a pop-up window with details for each entry, along with the location (you can see that on Google Maps) that it was recorded from.


3. You then need to tap the ‘three dots’ icon at the top right to open the overflow menu and delete the entry permanently.

How to read books for free on your iPhone and iPad 2019


I love to read, and I'm always in the middle of a book. Buying books can get expensive quickly, which is why I've loved public libraries since I was a girl. In recent years, I've become spoiled by the experience of reading on my iPad. I find I much prefer being able to change the font, read in dark mode at night, and avoid carrying heavy books on vacation. But how do you read library books on your iPhone or iPad? Thanks to Overdrive's apps, it's easy and free. You can borrow both ebooks and audiobooks from your local library and enjoy them on your iOS device.

Overdrive has three different apps available for iOS. The original app, Overdrive, still works great, but they've recently introduced two new apps which are designed to be more user-friendly. The company recommends Libby for public library users and Sora for school libraries. This article will focus on the Libby app.

Free - Download now

Here's how to borrow books and audiobooks from your public library with Libby.


Download Libby from the App Store


Enter your library's website


Find a book to read


Borrow or hold the book


Read your book
Download Libby from the App Store

Make sure you already have a library card before you get started with Libby.


Tap Yes when the AI personality, Libby, asks if you have a library card.


Tap Copy From My Other Device, I'll Search For A Library, or Yes, Guess My Library to allow her to help you find your closest connected library.


Choose where you want your books sent. You can have them delivered to Kindleor the Libby app. I prefer to read in the Kindle app on my iPad and iPhone, and I own a Kindle device, so I always select Kindle.


Enter your library's website


Tap Enter The Library.You may also like:Gihosoft iPhone Data Recovery


Must Read:Gihosoft Free Android Data Recovery


Must Read:Jihosoft iTunes Backup Unlocker


Jihosoft iTunes Backup Extractor free is a powerful tool to recover and extract important data from iPhone, iPad & iPod touch backup on Windows or Mac.


You may also like:


Gihosoft Total Video Converter is a professional all-in-one video tool that enables you to convert videos and audios into various different formats.


You may also like:online youtube downloader


Sign in with your library card or get an instant digital card if you need one.


Once you sign in, you'll see how many holds and loans you currently have on your account.


Tap Enter The Library once again.


Find a book to read


Tap Preferences to set your search parameters.


Select a specific format (books or audiobooks), language, audience, compatibility, and availability.


You can also sort by relevance, popularity, date added, release date, author, or title.


Tap the magnifying glass at the top to search for a specific title, author, or topic.


Tap Explore to browse titles if you don't have any specific book in mind.


Alternatively, you can just scroll down to start browsing.


Borrow or hold the book


Once you select a book, tap Borrow to download the book immediately if it's available.


If it's not currently available, you'll see the option to Place Hold. When you do so, you'll be alerted by email once your book becomes available.


If you selected Kindle as your default reader, you'll be taken to Amazon to complete the process. Log in with your Amazon credentials and choose which device you want the book delivered to (all of your Kindle apps and devices will sync so it doesn't really matter).


Tap Get Library Book.


Read your book

The last page you've read will not be synced between Libby and Kindle, so make sure to decide which app you want to read from and stick with that through the entire book.


If you're using the Kindle app, open the Kindle app and tap on book's cover.


If you'd prefer to read in the Libby app, tap Shelf at the bottom and choose the book you wish to read.


Enjoy!


Unlike paper library books, there are never any late fees. Your borrowed book will simply disappear off of your device when your library's loan period ends, which usually lasts two or three weeks. Libby is a great way to read or listen to current, popular books without spending a dime.

Free - Download now
How do you read digital library books?

Do you use a different app for checking out library books on your iPhone or iPad? Put your suggestions in the comments and we'll check them out!

Friday, August 24, 2018

How to Transfer Purchased Apps from iPhone to iTunes


How to Transfer Purchased Apps from iPhone to iTunes


Apps that you have purchased on your iPhone using your Apple ID can be easily transferred to the iTunes Library. Here’s how to do it with iTunes.


Step 1: Launch iTunes on your computer and then click on “Account.” Click on “Sign in” and sign in with the same Apple ID you used to purchase the apps.


Step 2: Click on Account > Authorization > Authorize this Computer. Only after you’ve done this are you then able to transfer the purchased apps.You may also like:Gihosoft iPhone Data Recovery


Step 3: Now connect the iPhone to the computer and once the device appears in iTunes, right click on the iPhone and select “Transfer Purchases” from the drop-down menu that appears. You can also go to Files > Devices > Transfer Purchases from "Device name."


Must Read:Gihosoft Free Android Data Recovery
Must Read:Jihosoft iTunes Backup Unlocker
Jihosoft iTunes Backup Extractor free is a powerful tool to recover and extract important data from iPhone, iPad & iPod touch backup on Windows or Mac.
You may also like:
Gihosoft Total Video Converter is a professional all-in-one video tool that enables you to convert videos and audios into various different formats.
You may also like:online youtube downloader
How to Transfer Apps from iTunes to iPhone


If you need to transfer apps from your iTunes library back to the iPhone, the following simple steps should help.


Step 1: Launch iTunes and then click “View.” Choose “Show Sidebar” to see all the items on the left side of the iTunes library.


Step 2: Connect the iPhone to the computer using USB cables. It should appear in the Devices area.
Step 3: Click on the device and then go to Summary > Apps. Select the apps you want to sync to your iPhone and then click Sync/Apply to begin the process of copying these apps to your iPhone.


Should You Upgrade from iPhone X to iPhone 11 Pro?

Now that the iPhone 11 Pro is out, many iPhone X owners are wondering if they should upgrade to it or not. If you are in a similar dilemm...